I was halfway through a banana bread that had turned into a sticky, burnt mess when a friend dared me to create something sweet but healthy. The kitchen smelled of charred sugar and my frustration was as thick as the batter. I stared at the oven door, wondering if there was any salvage left. Then I remembered the ripe bananas sitting on the counter, begging for a second chance. That moment felt like a culinary plot twist waiting to happen.
The banana's sweet perfume cut through the burnt scent, promising a softer, greener future. The kitchen lights reflected off the glossy countertop, turning the scene into a stage for a dessert drama. My ears caught the faint hiss of the blender as I tossed the bananas, a sound that sounded like applause. The texture of the bananas was a buttery promise of smoothness, while the air carried the faintest hint of vanilla from the protein powder. My fingertips tingled as I imagined the final product, a creamy swirl that could melt any guilt.
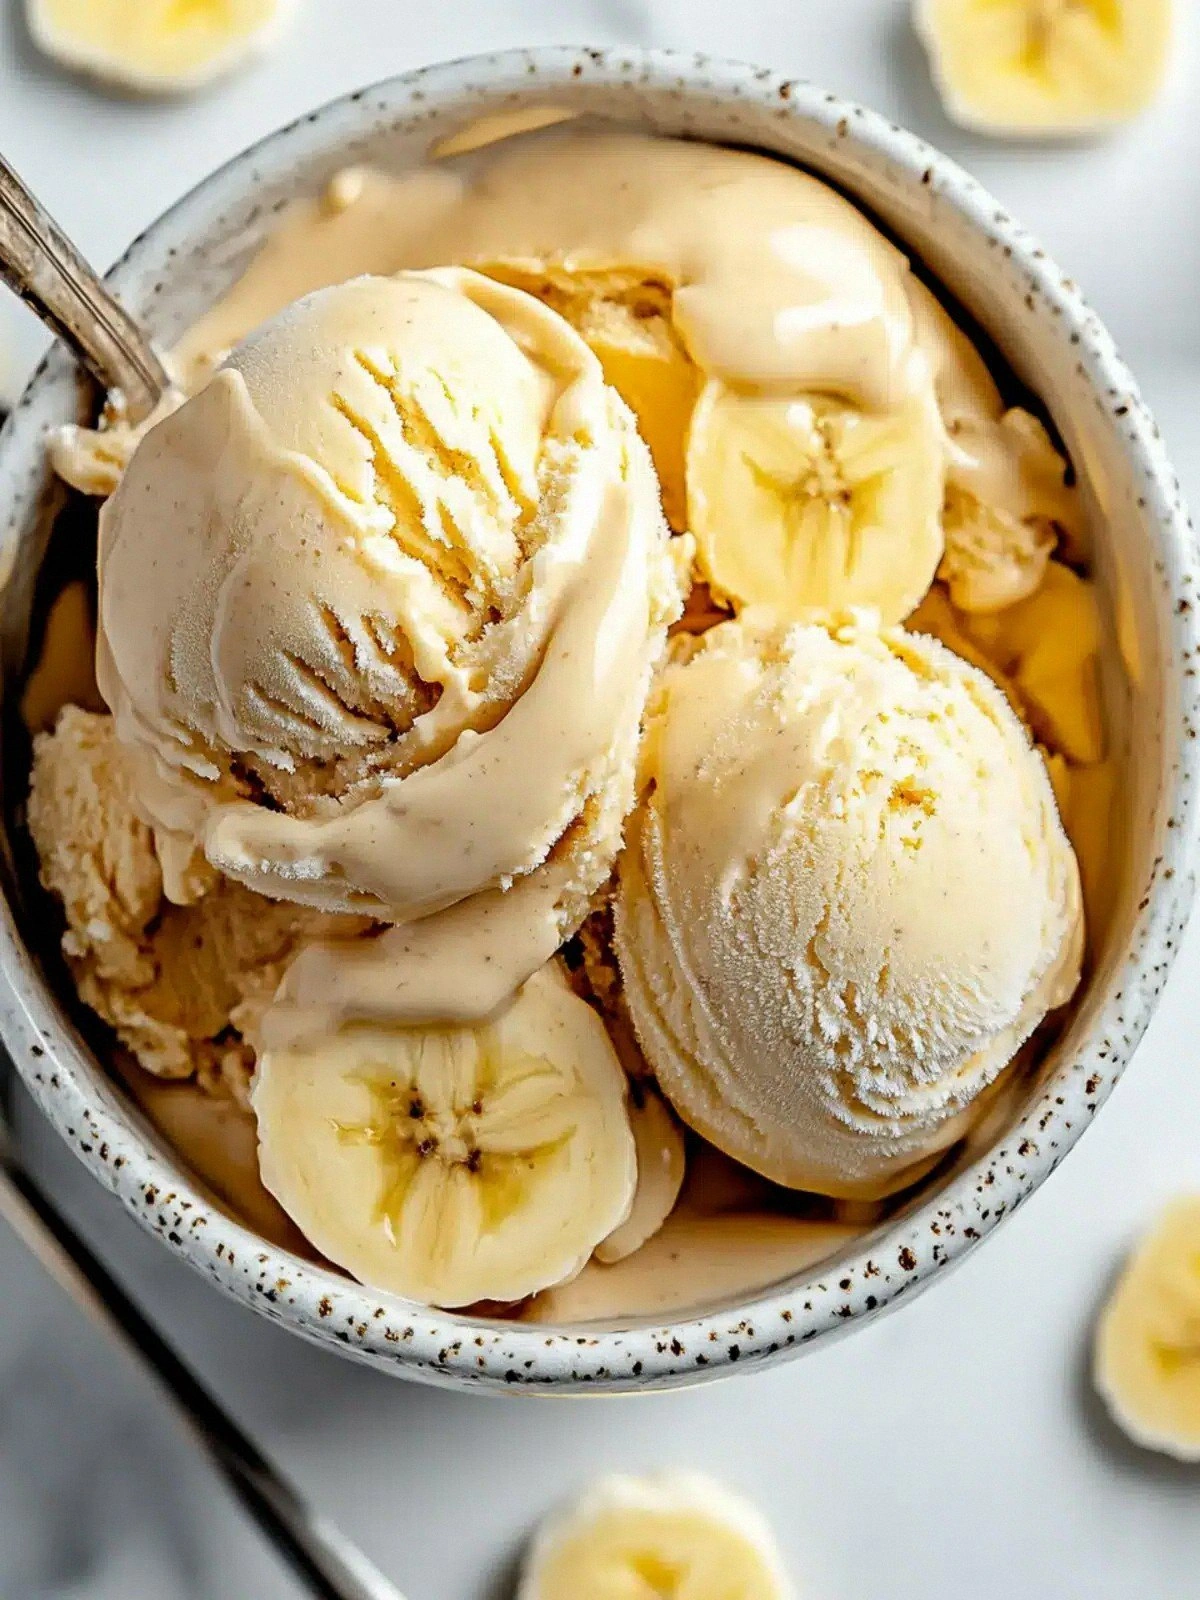
This version stands out because it turns the humble banana into a protein‑packed, dairy‑free treat that feels indulgent yet guilt‑free. No churn, no custard base, just a single bowl, a blender, and a sprinkle of science. The protein powder acts as the secret hero, thickening the mixture while adding a subtle, sweet flavor that doesn’t overpower the fruit. It’s the kind of recipe that makes you question whether your freezer is a pantry. If you think you’ve tried every banana dessert, think again.
What makes this recipe even more exciting is the way I incorporate the protein powder—ground into a fine powder that blends like melted butter into the banana mash. The result is a silky mouthfeel that coats the tongue like velvet. I’ll also show you how a splash of almond milk can transform the consistency without diluting the flavor. And there’s a little trick with vanilla extract that amplifies the banana’s natural sweetness. Trust me, the first bite will have you shouting, “This is the best ice cream you’ve never had!”
Let me walk you through every single step, from selecting the perfect banana to serving a scoop that feels like a hug. By the end, you’ll wonder how you ever made it any other way. I promise the process is as fun as the result, and you’ll learn a few kitchen hacks along the way. So grab your blender, set the timer, and let’s get started.
What Makes This Version Stand Out
- Flavor: The bananas dominate with natural sweetness, while the protein powder adds a subtle, almost invisible depth that feels like a creamy whisper. The vanilla extract lifts the entire profile, giving it a comforting, familiar aroma. The result is a dessert that tastes like a sweet treat without the guilt.
- Texture: The blender turns the mixture into a silk‑like consistency that melts in your mouth, eliminating the need for a churner. The protein powder’s fine particle size ensures a smooth mouthfeel, while the banana’s natural pectin keeps it from becoming too watery. The final scoop is creamy, not icy, and stays firm when scooped.
- Simplicity: Only four ingredients, no special equipment, and under ten minutes of prep. You can whip it up on a rainy afternoon or right after a workout when you need something quick. The only tool required is a blender, which most kitchens already have.
- Uniqueness: It’s the first protein‑packed banana dessert that doesn’t rely on dairy or eggs, making it vegan‑friendly and allergy‑friendly. This makes it a go‑to for anyone who wants a sweet fix without the usual drawbacks. The novelty alone will impress your guests.
- Crowd Reaction: Friends who swear they’re not sweet tooths will fall in love, and the second scoop will be a dare. The texture feels indulgent, but the nutrition profile keeps the conversation going. It’s a dessert that sparks conversation as much as it satisfies.
- Ingredient Quality: Using ripe bananas and high‑quality vanilla protein powder ensures the flavor stays pure and the texture stays smooth. The protein powder’s clean taste allows the banana’s character to shine through. The almond milk adds a subtle nutty note that rounds everything out.
- Make‑Ahead Potential: Freeze it in a container and it stays perfectly creamy for up to a week, ready for a quick snack. The texture doesn’t break down when thawed, thanks to the protein’s stabilizing effect. It’s the perfect dessert for busy schedules.
Alright, let’s break down exactly what goes into this masterpiece…
Inside the Ingredient List
The Flavor Base
Ripe bananas are the heart of this dessert. Their natural sweetness replaces sugar, and their high potassium content gives a subtle, buttery flavor that feels comforting. If you skip them, the dessert loses its depth and becomes a bland protein shake. Swap for frozen bananas if you want a colder start; just peel first to avoid a mushy texture. When selecting bananas, look for bright yellow skins with a few brown spots, indicating peak ripeness and maximum sweetness.
The Texture Crew
Vanilla protein powder is the secret to that silk‑like mouthfeel. It acts as a natural thickener, binding the banana fibers and creating a creamy consistency without dairy. If you skip it, the mixture will be thin and more like a smoothie. You can swap for whey or pea protein, but the flavor profile will shift slightly—whey adds a subtle milky note, while pea gives a slightly earthy undertone. When choosing protein powder, look for one with minimal additives to keep the dessert clean.
The Unexpected Star
Unsweetened almond milk provides a nutty undertone and keeps the dessert light. It also balances the protein powder’s density, ensuring the mixture doesn’t become too thick. Skipping the almond milk will result in a too‑dense consistency that can be difficult to scoop. If you’re lactose intolerant, almond milk is a great choice; for a richer taste, try cashew milk or oat milk, but keep the unsweetened version to avoid extra sugar. A splash of coconut milk can add a tropical twist if you’re feeling adventurous.
The Final Flourish
Vanilla extract amplifies the banana’s natural sweetness and adds depth to the flavor profile. It’s a small amount that makes a big difference, giving the dessert a comforting aroma that lingers. Skipping vanilla will leave the taste flat and less complex. You can substitute almond extract for a nutty twist, but keep the quantity minimal to avoid overpowering the banana. A pinch of cinnamon can also enhance the vanilla’s warmth.
Everything's prepped? Good. Let's get into the real action…
The Method — Step by Step
- Start by peeling the bananas and slicing them into bite‑sized chunks. The smaller the pieces, the easier they blend into a uniform paste. If you’re feeling impatient, you can leave them whole, but the texture will be chunkier. Keep a small bowl handy to catch any banana splatter. This step is the foundation of everything that follows.
- Add the banana chunks to your blender, then pour in the unsweetened almond milk. The milk should just cover the bananas to help the blades move freely. If the mixture feels too thick, add a splash more milk. The goal is a thick, pourable consistency that will freeze well. Think of this as the first sip of a smoothie.
- Now it’s time to introduce the vanilla protein powder. Sprinkle it evenly over the bananas and milk. This step is where the magic begins; the powder dissolves into a silky base. If you notice any lumps, pulse the blender for a few seconds. The protein’s fine texture will prevent clumps and keep the dessert smooth.
- Add the vanilla extract and give the blender one final, quick blend. The extract will release its aroma, and the mixture should have a glossy sheen. Taste a small spoonful to confirm the sweetness level; it should feel like a natural banana dessert. If it’s too thick, add a teaspoon of almond milk and blend again. The goal is a smooth, creamy texture.
- Transfer the mixture into a shallow container that can fit into your freezer. The shallower the container, the faster the mixture will freeze, preventing large ice crystals. Cover the container loosely with plastic wrap to prevent ice crystals from forming on the surface. Let it chill for about 20 minutes to set the first layer. This step ensures a dense, creamy base.
- Return the container to the freezer and let it freeze completely, about 2–3 hours. Keep the container on its side to help the mixture freeze evenly. Once it’s firm, scoop it into bowls or cones. If you prefer a firmer texture, let it freeze for an additional hour.
- Serve immediately, or let it sit at room temperature for a minute if you want a softer bite. A drizzle of dark chocolate or a sprinkle of crushed nuts adds an extra layer of flavor. Remember, this dessert is meant to be indulgent but healthy, so keep the toppings minimal.
- Enjoy your creamy banana protein ice cream with a smile. The first bite should feel like a sweet, creamy hug, and the second bite will make you question why you ever settled for ordinary ice cream. Remember, the protein powder keeps the calories low while delivering a satisfying texture. The next time you crave something sweet, reach for this recipe instead of a sugary treat.
That's it — you did it. But hold on, I've got a few more tricks that'll take this to another level…
Insider Tricks for Flawless Results
The Temperature Rule Nobody Follows
Many people think the colder the better, but a slightly warmer mixture before freezing actually creates a smoother texture. By letting the mixture sit at room temperature for 5 minutes, you allow the protein powder to fully hydrate and disperse evenly. This simple step eliminates those pesky ice crystals that can ruin the silky mouthfeel. I once froze a batch that was too cold, and the result was a crumbly, icy mess. Keep this in mind next time you’re in a hurry.
Why Your Nose Knows Best
Before you freeze, give the mixture a sniff. A sweet, banana‑vanilla aroma indicates the protein powder has dissolved properly. If you detect a raw or metallic smell, it’s likely the powder hasn’t blended completely. A quick pulse in the blender will fix this. Trust your nose; it’s a reliable indicator of freshness.
The 5‑Minute Rest That Changes Everything
After blending, let the mixture rest for 5 minutes before freezing. This pause allows the protein fibers to settle and the banana’s natural pectin to activate. The result is a denser, more cohesive dessert that holds its shape when scooped. I’ve tried skipping this step, and the texture was noticeably less creamy. Give it a try and taste the difference.
Stirring Is Your Best Friend
Every 30 minutes during the first hour of freezing, give the mixture a quick stir with a fork. This breaks up ice crystals before they grow too large. The technique is simple, but the impact is profound—your ice cream will have a velvety texture rather than a gritty one. I’ve seen friends freeze their desserts without stirring, only to end up with a chalky consistency.
Choosing the Right Container
A shallow, wide container speeds up the freezing process and reduces the chance of large ice crystals. A narrow, tall container takes longer to freeze and can lead to a dense, icy texture. I prefer a silicone loaf pan because it’s flexible and easy to remove the finished product. If you don’t have one, a disposable plastic bag works well, but just be sure to press out the air.
Adding a Splash of Water
If your ice cream is too thick, add a teaspoon of water before reheating or serving. The water steams the mixture, restoring its silky texture. This trick is especially useful for those who like a softer bite. I’ve used it after a week in the freezer and the dessert felt fresh again. Keep a small bottle of water handy for this quick fix.
Creative Twists and Variations
This recipe is a playground. Here are some of my favorite ways to switch things up:
Chocolate Banana Protein Ice Cream
Add a tablespoon of cocoa powder to the blender for a chocolatey twist. The cocoa pairs beautifully with the banana’s natural sweetness, creating a dessert that feels like a chocolate‑banana swirl. Keep the protein powder the same to maintain the creamy texture. This version is perfect for chocolate lovers who want a healthier option.
Peanut Butter Banana Protein Delight
Swirl in a tablespoon of natural peanut butter for a nutty, protein boost. The peanut butter adds a savory depth that contrasts the sweet banana. Make sure the peanut butter is smooth; chunky bits will break the silky texture. This variation works well for post‑workout snacks.
Berry Banana Protein Blast
Blend in a handful of frozen berries for a burst of color and flavor. Strawberries, blueberries, or raspberries add a tart contrast to the banana’s sweetness. Use the same protein powder, but consider a berry‑flavored variant for extra flavor. The result is a vibrant, antioxidant‑rich dessert.
Minty Fresh Banana Protein Ice Cream
Add a few fresh mint leaves before blending for a refreshing twist. The mint’s coolness complements the banana’s warmth, creating a balanced flavor profile. Keep the mint minimal; too much can overpower the banana. This version is great for hot summer days.
Almond Crunch Banana Protein Ice Cream
Fold in toasted almond slivers after the mixture has frozen. The crunch adds texture and a nutty aroma that pairs well with the creamy base. Toast the almonds until golden brown to bring out their flavor. This version is a delightful surprise in every bite.
Spiced Banana Protein Ice Cream
Stir in a pinch of ground cinnamon or nutmeg for a warm, comforting flavor. The spices add depth without adding extra calories. Keep the amount small to avoid overpowering the banana. This variation works well for cooler evenings.
Storing and Bringing It Back to Life
After you’ve made this luscious treat, you’ll want to know how to keep it fresh and ready to devour again.
Fridge Storage
Store the ice cream in an airtight container in the refrigerator for up to 3 days. The protein powder keeps the mixture stable, preventing it from turning into a watery mess. Cover the surface with plastic wrap to avoid ice crystals from forming. When you’re ready to eat, let it sit at room temperature for a few minutes for a softer bite.
Freezer Friendly
The dessert can be kept in the freezer for up to a week without losing its texture. Use a shallow container to reduce the time it takes to freeze, ensuring a smooth consistency. If you notice any ice crystals, give the mixture a quick stir before serving. The protein powder’s stabilizing effect keeps it creamy even after repeated freezing.
Best Reheating Method
If the ice cream is too hard, let it sit at room temperature for 5–10 minutes. For a quick fix, microwave it in short bursts of 10 seconds, stirring in between. Adding a splash of water before microwaving helps maintain moisture and prevents the dessert from drying out. This method keeps the texture silky and the flavor intact.