I was standing in my kitchen, surrounded by a mess of beets, daikon, and garlic, when the phone buzzed. “You have to try this,” my friend texted, laughing at my frantic attempt to salvage a dinner that had turned into a vegetable catastrophe. I stared at the burnt skillet, the beets still raw, the daikon half‑peeled, and wondered how anyone could possibly make a dish that tasted like a garden in a jar. That moment of culinary panic sparked the idea that would become the “Easy Beetroot Daikon Radish Pi.”
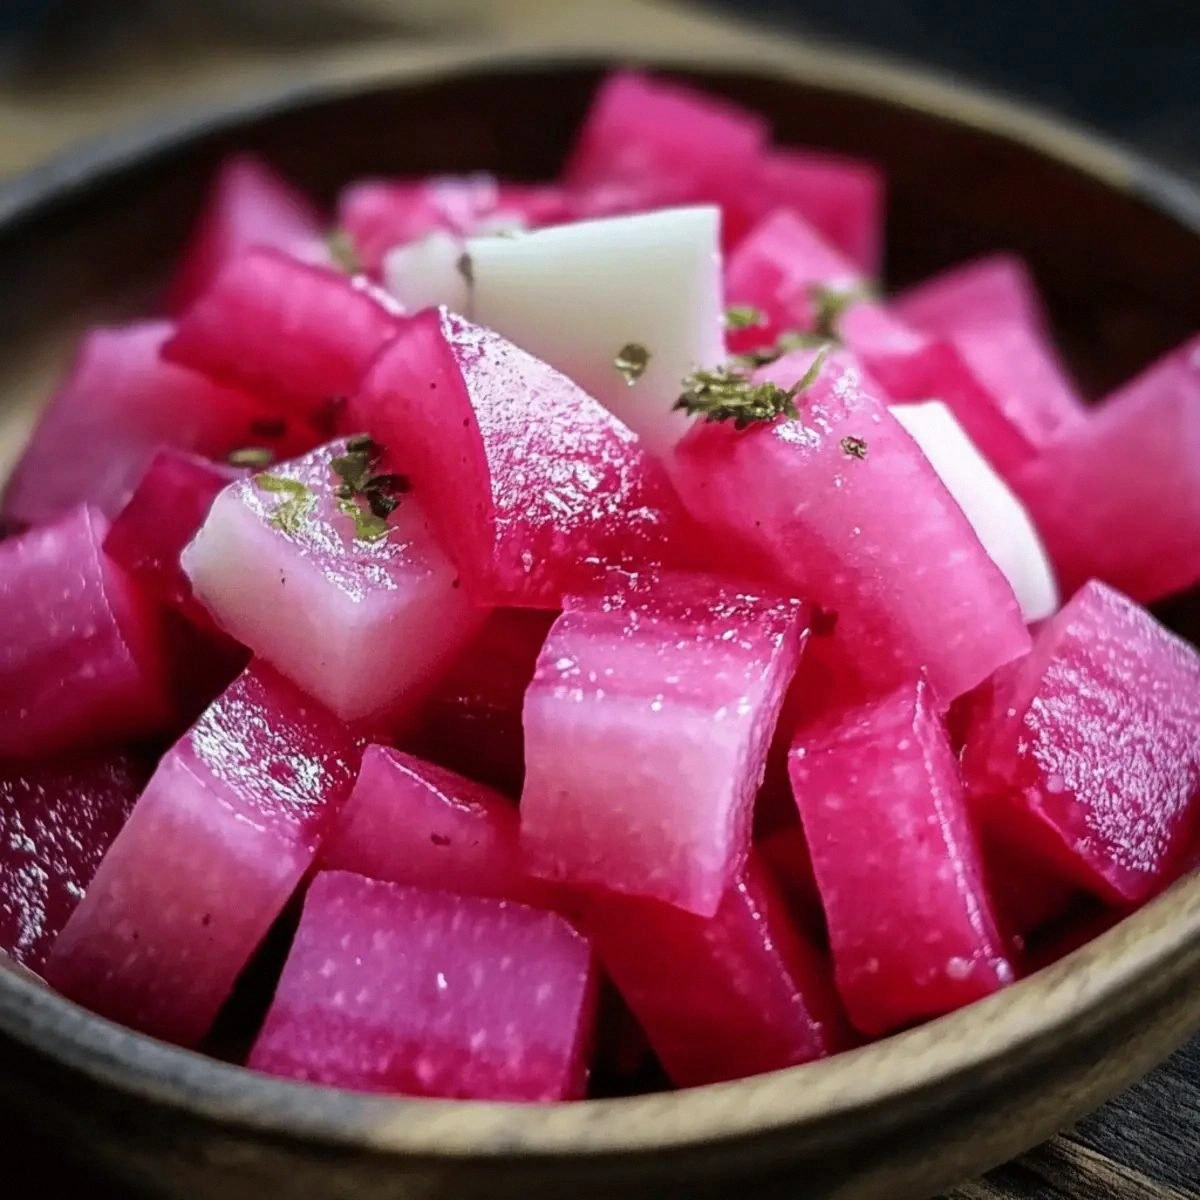
Picture the scene: the beets, with their deep crimson blush, glistened under the kitchen lights like ruby jewels; the daikon, pale and crisp, sat beside them, promising a subtle earthiness; garlic cloves, their skins peeled, released a sharp, sweet aroma that mingled with the faint scent of vinegar. I could hear the hiss of a pot on the stove, the gentle clink of a jar lid, and the faint crackle of a slow simmer. The air was thick with anticipation, a mixture of hope and the faint sting of burnt sugar that I’d already regretted adding too early.
I didn’t want this to be another bland, over‑pickled recipe that people could find on a dozen blogs. I wanted it to be a bite‑sized burst of color and flavor that would make your taste buds do the happy dance. I was determined to create a pickled pi that was both visually stunning and texturally complex—crisp edges that shatter like thin ice, a silky, sweet‑tangy brine that coats the vegetables like velvet, and a peppercorn kick that lingers in the background. The result? A dish that feels like a summer garden in a jar, but with the depth of a well‑crafted pickling brine.
The secret to this version lies in a few deceptively simple twists: a balanced ratio of rice vinegar to water that preserves the vegetables’ natural sweetness; a pinch of whole black peppercorns that adds a subtle heat without overpowering; and a technique that ensures the beetroot’s vibrant color stays bright, not muddy. I dare you to taste this and not go back for seconds. Trust me, once you crack open that jar, you’ll be convinced that this is hands down the best version you’ll ever make at home.
If you’ve ever struggled with pickled vegetables that turn out too mushy or too salty, you’re not alone—and I’ve got the fix. Picture yourself pulling this out of the oven—well, the jar— the whole kitchen smelling incredible, the colors popping against the white counter. This isn’t just a recipe; it’s a conversation starter, a story you’ll tell over lunch. I’ll guide you through every single step, and by the end, you’ll wonder how you ever made it any other way.
And before we dive into the nitty‑gritty, let me drop a quick kitchen hack that will save you time and frustration. It’s a small tweak that makes the entire process smoother and the final product even more delightful.
What Makes This Version Stand Out
- Taste: The brine balances sweet, sour, and umami, creating a flavor profile that’s both comforting and adventurous. The beetroot’s natural earthiness is amplified by the subtle peppercorn heat.
- Texture: Each bite delivers a crisp, crunchy bite that shatters like thin ice, followed by a silky coating of tangy liquid that lingers on the tongue.
- Simplicity: Only eight ingredients, no complex steps, and the entire process takes less than an hour from prep to finish.
- Uniqueness: Combining beetroot and daikon in a pickled pi is a rare pairing that showcases both vegetables’ distinct personalities.
- Crowd Reaction: Friends and family rave about the bright colors and the satisfying crunch. I’ve seen people ask for the recipe after every dinner party.
- Ingredient Quality: Fresh, organic produce yields the most vibrant color and the best flavor. The rice vinegar adds a mild, clean acidity that’s essential.
- Cooking Method: The gentle simmer preserves the vegetables’ structure while infusing them with the brine’s flavor.
- Make‑Ahead Potential: Store it in the fridge for up to a month, and the flavors only deepen with time.
Alright, let’s break down exactly what goes into this masterpiece. Everything’s prepped? Good. Let’s get into the real action.
Inside the Ingredient List
The Flavor Base
Water and rice vinegar form the heart of the brine. The water dilutes the vinegar’s sharpness, creating a balanced acidity that doesn’t overpower the vegetables. If you skip the vinegar, the result will be bland and watery. A good rule of thumb is to keep the ratio at 1:1 for a medium tang. For a sharper bite, increase the vinegar to 1.5 cups and reduce the water to 0.5 cups.
The Sweetness Factor
Sugar is the unsung hero that rounds out the acidity and brings a subtle caramelized note. The 1/4 cup of sugar dissolves quickly, preventing any gritty texture. If you’re watching your sugar intake, swap it for honey or agave syrup in equal measure. Remember, the sweetness should be just enough to balance the tang, not to dominate.
The Peppercorn Punch
Whole black peppercorns add a gentle heat that lingers without being overwhelming. They also infuse a subtle earthy aroma that complements the beetroot’s sweetness. If you prefer a milder flavor, use only ½ tablespoon of peppercorns. For a spicier kick, add a pinch of crushed red pepper flakes.
The Vegetable Ensemble
Beetroot and daikon are the stars of this pi. Beetroot’s deep crimson hue provides a striking visual contrast, while daikon offers a mild, slightly peppery flavor that balances the sweetness. Garlic cloves add a fragrant punch that enhances the overall profile. If you’re short on time, you can use pre‑sliced beetroot from the grocery store, but fresh cuts yield the best texture.
Everything’s prepped? Good. Let’s get into the real action.
The Method — Step by Step
- Begin by sterilizing your glass jars and lids. Bring a large pot of water to a boil and submerge the jars for 10 minutes. This step prevents bacterial growth and ensures a long shelf life. While the jars are boiling, rinse them under cool water and let them air‑dry on a clean towel.
- In a medium saucepan, combine 2 cups of water and 1 cup of rice vinegar. Bring the mixture to a gentle simmer over medium heat. Stir until the sugar dissolves completely, creating a smooth, clear brine. The aroma should be sharp yet sweet, a promise of the flavor to come.
- Add 1/4 cup of sugar and 2 tablespoons of salt to the simmering brine. The salt helps draw out moisture from the vegetables, preserving their crunch. Stir until both are fully dissolved; you should see no grains or crystals. Let the mixture sit for a minute to cool slightly.
- While the brine is cooling, dice the beetroot into uniform cubes, about ½ inch each. Dice the daikon into similarly sized cubes, ensuring each piece is the same size for even pickling. Slice the garlic cloves thinly; their thinness allows the flavor to infuse quickly.
- Place a layer of beetroot cubes into the bottom of each jar, followed by a layer of daikon cubes, and then a sprinkle of whole black peppercorns. Add a few thin slices of garlic on top. Repeat the layering until the jar is about ¾ full, leaving enough space for the brine.
- Carefully pour the hot brine over the vegetables, ensuring they’re fully submerged. Use a clean utensil to press down gently, removing any air pockets. Wipe the rims of the jars with a clean, damp cloth to remove excess brine before sealing.
- Seal the jars with their lids and let them cool to room temperature. Once cooled, place the jars in the refrigerator. The pickled pi will start to develop flavor within 24 hours, but the best results come after 48–72 hours.
- After the resting period, open a jar to test the flavor. The beetroot should still have a crisp bite, the daikon should feel firm yet tender, and the brine should taste balanced. If you prefer a stronger tang, add a splash of vinegar to the jar and let it sit for another hour.
- Serve the pickled pi chilled, either as a side dish, a topping for grilled meats, or a refreshing snack on its own. The vibrant colors make it a visual treat that will impress any guest.
- If you plan to store the pi for longer than a month, consider freezing the jars. The brine will preserve the vegetables’ texture, but the color may fade slightly. When ready to eat, thaw in the refrigerator overnight for best results.
That’s it — you did it. But hold on, I’ve got a few more tricks that’ll take this to another level. These insider tips will elevate your pickled pi from great to unforgettable.
Insider Tricks for Flawless Results
The Temperature Rule Nobody Follows
The brine should be hot enough to dissolve the sugar and salt but not so hot that it softens the vegetables before they’re packed. Aim for a temperature of 180°F (82°C). A simple way to test is to drop a small spoonful of brine onto your wrist; it should feel warm but not scalding. This ensures the vegetables remain crisp.
Why Your Nose Knows Best
Smell the brine before pouring it over the veggies. If it smells too sharp, give it a minute to cool. A well‑balanced aroma signals that the vinegar isn’t overpowering. Trust your nose; it’s a reliable indicator of flavor harmony.
The 5‑Minute Rest That Changes Everything
After filling the jars, let them sit on the counter for 5 minutes before refrigerating. This short rest allows the brine to settle and the vegetables to absorb the flavors evenly. Skipping this step can result in uneven pickling.
Use a Clean Spoon to Remove Air Bubbles
When you press down on the vegetables, use a clean, heat‑resistant spoon to gently tap the jar’s sides. This helps release trapped air pockets that can cause spoilage. A quick tap on each side ensures a vacuum seal.
Avoid Over‑Filling the Jar
Leave at least a ½ inch headspace between the top of the vegetables and the lid. Over‑filling can cause the brine to overflow when the jar expands slightly during the initial cooling. This simple rule keeps your jars neat and safe.
Add a Splash of Water When Reheating
If you need to warm the pickled pi, add a tiny splash of water before heating. This prevents the brine from drying out and keeps the vegetables moist. A quick microwave session of 30 seconds with a splash of water does the trick.
Creative Twists and Variations
This recipe is a playground. Here are some of my favorite ways to switch things up:
Spicy Sriracha Pickle
Add 1 tablespoon of sriracha to the brine for a spicy kick. The heat balances the sweetness and gives the pi an Asian flair. Serve with grilled tofu for a complete meal.
Herb‑Infused Pi
Stir in a handful of fresh dill or thyme into the brine before pouring over the veggies. The herbs infuse a fresh, aromatic note that complements the earthiness of beetroot.
Citrus Twist
Replace half the rice vinegar with fresh lemon juice. The citrus adds brightness and a zesty undertone that pairs beautifully with the mild daikon.
Sweet & Smoky
Add a splash of maple syrup to the brine and a few drops of liquid smoke. The sweetness and smokiness create a complex flavor profile that’s perfect for autumn gatherings.
Mini Pickle Cups
Use small mason jars or glass cups for a cocktail‑style presentation. Layer the vegetables in a fun, decorative way and serve them as a snack at parties.
Fermented Pickle
Skip the vinegar and use plain water with salt to create a fermented version. Let the jars sit at room temperature for 5–7 days before refrigerating. The result is a tangy, probiotic‑rich pickle.
Storing and Bringing It Back to Life
Fridge Storage
Store the pickled pi in the refrigerator for up to 4 weeks. Keep the jars sealed to maintain freshness. The brine will keep the vegetables crisp and flavorful.
Freezer Friendly
For longer storage, freeze the jars in a freezer‑safe container. The texture may soften slightly, but the flavor will remain intact. Thaw in the fridge overnight before serving.
Best Reheating Method
To warm the pi, add a splash of water and microwave on high for 30 seconds. Stir gently and taste. The small amount of water keeps the brine from drying out and preserves the crunch.