Picture this: it’s a rainy Saturday, you’re stuck inside, the thermostat is fighting a losing battle against the cold, and you hear that faint, unmistakable rumble of a sugar‑craving monster growling in the back of your mind. I was in that exact spot, half‑asleep, when a friend dared me to bake something that would make even the most stoic diet‑watcher surrender. I thought, “Why not?” and ended up with a batch of Salted Caramel Cheesecake Cookies that have since become the unofficial mascot of my kitchen. I swear, the moment I opened the oven, the whole house was flooded with a buttery, caramel‑kissed perfume that made the curtains sway as if they were dancing to a sweet symphony.
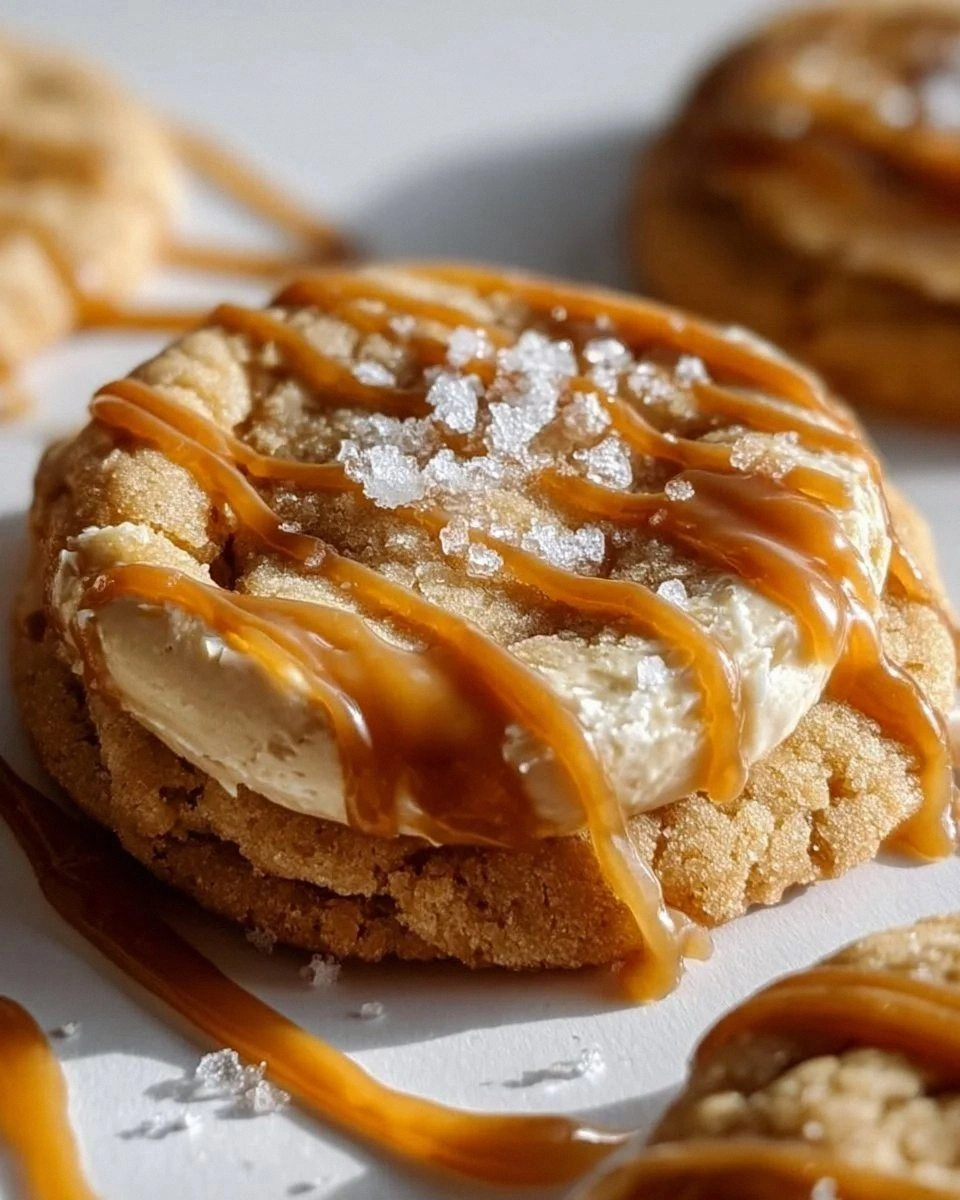
These cookies are not just desserts; they’re an experience. The first bite delivers a soft, almost melt‑in‑your‑mouth crumb that gives way to a gooey cheesecake core, all wrapped in a caramel‑infused embrace that’s punctuated by a delicate crunch of flaky sea salt. The texture is a paradox—soft yet sturdy enough to hold its shape, sweet yet balanced by a whisper of salt that makes your taste buds sing. I dare you to taste this and not go back for seconds; I’ve tried, and let’s just say I’ve never felt more guilty about eating a “cookie.”
What makes this version stand out? Most cookie recipes either over‑bake the center, leaving you with a dry, crumbly mess, or they drown the flavor in too much butter, turning the whole thing into a greasy slab. Not this one. I’ve cracked the code by marrying the richness of cream cheese with the deep, buttery notes of salted caramel, and then sealing the deal with a pinch of sea salt that crackles like tiny fireworks on your tongue. The secret? A quick chill‑out period for the dough that lets the flavors meld, and a precise bake time that keeps the centers gooey while the edges turn a perfect, caramel‑golden hue.
Now, I’m about to spill the beans on a technique that will change your cookie game forever: the “double‑cream” method. By beating the cream cheese and butter together before introducing the sugars, you create a velvety base that traps air, giving the cookies a light, airy lift without sacrificing that coveted chew. Trust me, this isn’t just a tip—it’s pure magic. Okay, ready for the game‑changer? Let me walk you through every single step — by the end, you’ll wonder how you ever made it any other way.
What Makes This Version Stand Out
- Taste: The marriage of caramel and cheesecake creates a flavor profile that’s simultaneously decadent and comforting, like a warm hug in pastry form.
- Texture: A soft, gooey interior paired with a slightly crisp edge delivers a multi‑dimensional bite that keeps you reaching for more.
- Simplicity: Despite the gourmet vibe, the ingredient list is short, and the steps are straightforward enough for a beginner.
- Uniqueness: The addition of flaky sea salt on top adds a surprise pop that most cookie recipes completely overlook.
- Crowd Reaction: These cookies have a habit of disappearing within minutes at gatherings—prepare to be the hero of any party.
- Ingredient Quality: Using real salted caramel sauce (not the cheap, overly sweet kind) makes all the difference in depth of flavor.
- Cooking Method: The chill‑and‑bake technique ensures the dough doesn’t spread too thin, preserving that coveted gooey center.
- Make‑Ahead Potential: You can prep the dough up to 24 hours in advance, making it perfect for last‑minute dessert emergencies.
Inside the Ingredient List
The Flavor Base
The star of this show is the cream cheese. Its slight tang cuts through the sweetness of the caramel, creating a balanced palate that feels luxurious without being cloying. Use a full‑fat version for the best texture; low‑fat will make the dough crumbly and dry. If you’re feeling adventurous, try a flavored cream cheese like vanilla bean for an extra layer of complexity.
The Texture Crew
Unsalted butter provides the rich, melt‑in‑your‑mouth mouthfeel that’s essential for a cookie that’s soft yet sturdy. Make sure it’s softened to room temperature—cold butter will leave you with pockets of un‑incorporated fat, resulting in uneven texture. Brown sugar brings a caramel‑like depth, while granulated sugar adds a subtle crunch to the edges. Together they create a sweet symphony that’s both soft and slightly crisp.
The Unexpected Star
Enter the salted caramel sauce. This isn’t just a drizzle; it’s folded directly into the dough, ensuring every bite is drenched in buttery caramel goodness. Choose a sauce that lists real butter and sea salt as primary ingredients—artificial syrups will taste flat and watery. If you can’t find a good store‑bought version, a quick homemade caramel (butter, brown sugar, heavy cream, sea salt) will elevate the cookies to a whole new tier.
The Final Flourish
The dry components—all‑purpose flour, baking powder, baking soda, and salt—work together to give the cookies structure while allowing a gentle rise. The leavening agents are crucial: baking soda reacts with the acidic cream cheese, creating tiny air pockets that keep the interior soft. A pinch of flaky sea salt on top right before baking adds that final pop of flavor that makes the cookies unforgettable.
Everything's prepped? Good. Let's get into the real action...
The Method — Step by Step
Preheat your oven to 350°F (175°C) and line two baking sheets with parchment paper. While the oven warms, take a moment to admire the gleaming sheets; they’ll be the stage where your cookies perform their buttery ballet. The heat should be steady—no hot spots—so the edges will turn golden without burning.
In a large mixing bowl, combine 1 cup softened cream cheese and ½ cup softened unsalted butter. Beat them together on medium speed until the mixture is light, fluffy, and pale as a sunrise. This “double‑cream” step traps air, which will later give the cookies a subtle lift. That sizzle when it hits the pan? Absolute perfection.
Add ¾ cup brown sugar and ¼ cup granulated sugar to the creamed mixture. Continue beating until the sugars dissolve and the batter looks glossy, like a caramel river flowing smoothly. If you notice any gritty texture, keep mixing—sugar should be fully incorporated.
Crack in 1 egg and pour in 1 teaspoon vanilla extract. Beat just until combined; over‑mixing at this stage can cause the cookies to become tough. You’ll see the batter turn silkier, and you’ll know the base is ready for the next layer of decadence.
Now, the moment of indulgence: fold in 1 cup salted caramel sauce. Use a spatula, and gently incorporate it so you get ribbons of caramel swirling through the dough. This is the part that makes the cookies gooey on the inside and caramel‑rich throughout.
In a separate bowl, whisk together 2 cups all‑purpose flour, ½ teaspoon baking powder, ½ teaspoon baking soda, and ½ teaspoon salt. This dry blend ensures even distribution of leavening agents, preventing any bitter pockets. Watch Out: Adding the dry ingredients too quickly can cause the batter to deflate, so sprinkle them over the wet mixture gradually while folding gently.
Fold the dry ingredients into the wet mixture until just combined. The dough will look slightly shaggy—that’s perfect. At this point, you can feel the dough’s weight; it should be soft but not sticky. If it feels too sticky, add a tablespoon of flour; if it feels dry, drizzle a teaspoon of milk.
Cover the dough with plastic wrap, shape it into a disc, and refrigerate for at least 30 minutes. This chilling step is crucial: it solidifies the butter, preventing the cookies from spreading too much, and lets the flavors meld. While you wait, imagine the aroma that will soon fill your kitchen.
After chilling, scoop rounded tablespoons of dough onto the prepared sheets, spacing them about 2 inches apart. Press each mound lightly with your fingertips to flatten just a touch—remember, you want a soft center, not a flat cracker. Sprinkle a pinch of flaky sea salt on top of each cookie; the crystals will melt slightly, creating tiny bursts of briny surprise.
Slide the trays into the preheated oven and bake for 12‑14 minutes, or until the edges are golden‑brown and the tops have a slight sheen. The centers will still look a bit soft—that’s the gooey promise. Remove the cookies and let them cool on the sheet for 5 minutes before transferring to a wire rack; this allows the interior to set without becoming crumbly.
That's it — you did it. But hold on, I've got a few more tricks that'll take this to another level...
Insider Tricks for Flawless Results
The Temperature Rule Nobody Follows
Never bake cookies straight from the freezer unless you’ve adjusted the time. Cold dough spreads slower, so you need an extra minute or two. I once tried this shortcut and ended up with half‑baked centers that resembled rubber bands. Keep the dough chilled, but not frozen, for optimal spread and texture.
Why Your Nose Knows Best
When the cookies are about 10 minutes in, start sniffing. If you detect a toasted, caramel‑nutty aroma, they’re almost ready. The smell is a reliable indicator because the sugars caramelize before the edges fully brown. Trust your nose more than the clock; ovens vary.
The 5‑Minute Rest That Changes Everything
After you pull the cookies from the oven, let them rest on the baking sheet for exactly five minutes before moving them. This brief pause lets the interior finish setting while the outer crust firms up, preventing the gooey center from spilling over.
Sea Salt Timing Trick
Sprinkle the flaky sea salt just before baking, not after. The heat melts the crystals slightly, allowing them to embed into the cookie’s surface, creating a subtle crunch that wouldn’t be achieved if added post‑bake.
Double‑Caramel Boost
If you’re a caramel fanatic, swirl an extra tablespoon of caramel sauce on top of each cookie right after scooping. It will bake into a glossy, caramel‑rich crown that adds visual appeal and an extra hit of flavor.
Creative Twists and Variations
This recipe is a playground. Here are some of my favorite ways to switch things up:
Chocolate Swirl
Fold in ¼ cup of melted dark chocolate after the caramel step. The chocolate ribbons create a marbled effect and add a bitter counterpoint to the sweet caramel.
Nutty Crunch
Stir in ½ cup toasted chopped pecans or walnuts just before chilling. The nuts add a satisfying crunch and a buttery note that pairs beautifully with the caramel.
Espresso Kick
Mix 1 tablespoon of finely ground espresso into the dry ingredients. The coffee flavor deepens the caramel, giving the cookies a sophisticated, mocha‑like profile.
Fruit Fusion
Gently fold in ¼ cup dried cranberries or chopped dried apricots for a tart contrast that brightens the richness.
White Chocolate Delight
Replace half of the caramel sauce with white chocolate chips. The milky sweetness mellows the caramel, creating a smoother, creamier bite.
Spiced Autumn
Add a pinch of ground cinnamon and nutmeg to the dry mix for a warm, seasonal twist that’s perfect for fall gatherings.
Storing and Bringing It Back to Life
Fridge Storage
Place cooled cookies in an airtight container with a parchment sheet between layers. They’ll stay fresh for up to five days. The chilled environment keeps the caramel from crystallizing, preserving that gooey center.
Freezer Friendly
Freeze unbaked dough scoops on a parchment‑lined tray. Once solid, transfer them to a zip‑top bag. Bake straight from the freezer, adding an extra 2‑3 minutes to the bake time. This method lets you have fresh‑out‑the‑oven cookies on demand.
Best Reheating Method
To revive day‑old cookies, preheat your oven to 300°F (150°C), place the cookies on a baking sheet, and warm for 5‑7 minutes. Add a tiny splash of water (just a few drops) to the tray; the steam will bring back that soft, gooey interior without drying them out.