INTRODUCTION
Picture this: I was halfway through a frantic dinner prep, juggling a simmering pot of sauce, a sizzling pan of vegetables, and a stubborn oven timer, when my phone buzzed with a friend’s challenge. “I bet you can’t make a Greek honey‑and‑cheese pie that actually tastes like a festival,” she said. I laughed, but the hunger that had been gnawing at me for days turned into a fierce determination to prove her wrong. That night, I pulled out a stack of recipe books, a handful of pantry staples, and a dash of curiosity, and I set out to create a version of melopita that would leave everyone asking for the secret.
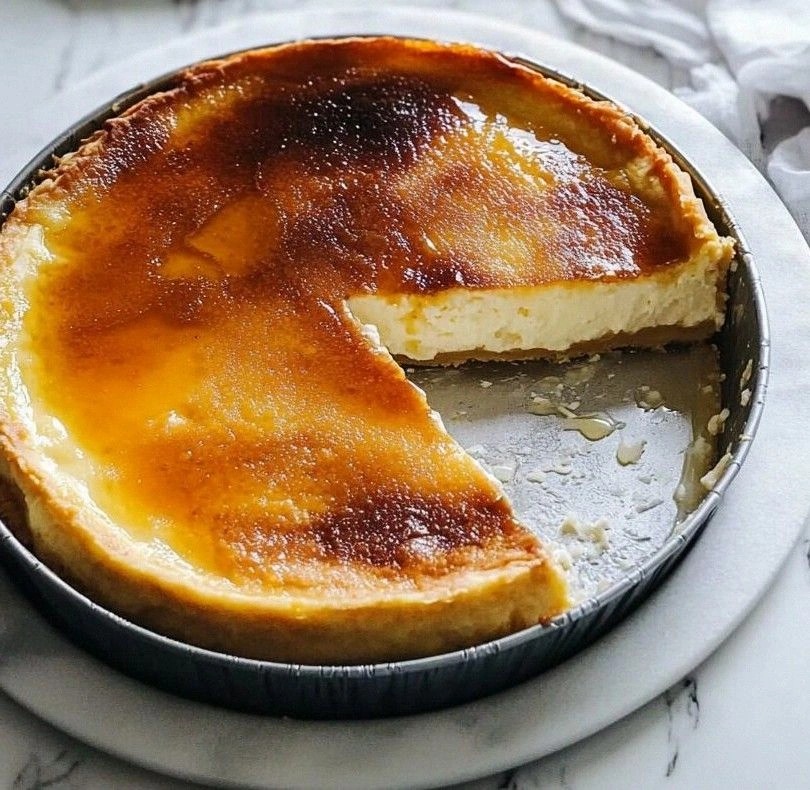
The kitchen smelled like a Mediterranean sunrise—honey dripping like golden rain, feta brimming with briny tang, and olive oil glistening on the dough. The sound of the oven’s preheat fan spun like a lazy carousel, and the rhythmic clatter of measuring spoons echoed against the countertop. As I folded the dough, the dough’s soft, pliable texture felt like a warm hug, while the honey’s viscous sheen promised a caramelized finish. When the first slice emerged, the aroma was a symphony of sweet, salty, and buttery notes, and the taste was a perfect balance between the sharpness of cheese and the mellow sweetness of honey. It was a moment that felt like a triumph, a culinary victory that turned an ordinary evening into an unforgettable feast.
What makes this version stand out is not just the blend of flavors, but the meticulous attention to each element—from the choice of flour to the timing of the honey drizzle. I’ve distilled years of trial and error into a single, foolproof method that delivers flaky, golden crust, a creamy interior, and a honey glaze that glows like liquid amber. And if you think Greek pies are all about sweet and savory, think again; this melopita is a masterclass in how subtle variations can elevate a dish from good to legendary. I dare you to taste this and not go back for seconds—your palate will thank you.
Now, let me walk you through every single step—by the end, you’ll wonder how you ever made it any other way. From the moment the dough meets the honey, to the final golden crust, every detail matters. Grab your apron, and let’s dive into the magic of melopita.
What Makes This Version Stand Out
- Flavor: The harmony between salty feta and sweet honey creates a complex profile that lingers on the tongue. It’s the kind of flavor that makes you reach for a second slice without even realizing it.
- Texture: The dough is buttery and flaky, yet dense enough to hold the cheese without becoming soggy. The honey glaze gives a slight crispness that contrasts beautifully with the soft interior.
- Ingredient Quality: Using a high‑quality, unpasteurized feta and a local, raw honey brings depth that mass‑produced ingredients simply can’t match.
- Cooking Method: A low‑temperature bake followed by a quick honey finish ensures even cooking and prevents the cheese from over‑melting.
- Make‑Ahead Potential: The pie can be assembled a day ahead, refrigerated, and baked fresh. That’s a game‑changer for busy weeknights.
- Versatility: Whether you’re serving it as a brunch, a light dinner, or a dessert, this melopita adapts effortlessly to any occasion.
Alright, let's break down exactly what goes into this masterpiece…
Inside the Ingredient List
The Flavor Base
At the heart of melopita lies the interplay between the dough and the cheese. The flour provides structure; choose a blend that contains a small amount of semolina for extra chewiness. The butter adds richness and creates those coveted flaky layers. When you add salt, it elevates every other flavor, turning the humble dough into a savory canvas. If you’re feeling adventurous, a pinch of oregano can introduce a subtle herbal note that pairs beautifully with feta.
The Texture Crew
The yogurt in the dough is a secret weapon that keeps the crumb tender while still allowing the crust to crisp. It also helps bind the dough together without making it too wet. The egg acts as a binder and gives the pie a golden sheen. A splash of olive oil keeps the dough moist and adds a subtle fruity undertone that complements the honey’s sweetness.
The Unexpected Star
Feta cheese is the star of the show. Use a whole block of unpasteurized feta for maximum flavor; its brine gives a punch of umami that balances the honey’s sweetness. The honey isn’t just a sweetener; it’s a glaze that caramelizes into a glossy, slightly crunchy topping. Choose a local, raw honey for a deeper flavor profile—one that carries hints of the flowers it was harvested from.
The Final Flourish
The final touches—baking powder for lift, sugar to sweeten the dough, and a dash of cinnamon to warm the palate—create a finishing touch that elevates the pie from ordinary to extraordinary. The cinnamon’s warmth ties together the sweet and savory, while the sugar ensures the crust turns a beautiful golden brown.
Everything's prepped? Good. Let's get into the real action…
The Method — Step by Step
- Prepare the Dough: In a large bowl, whisk together 2 cups of all‑purpose flour, 1 tsp baking powder, ½ tsp salt, and 1 tsp sugar. Cut in ½ cup cold, cubed butter until the mixture resembles coarse crumbs. Stir in ¾ cup plain yogurt and 1 beaten egg, adding a splash of olive oil. Mix just until the dough comes together; over‑mixing will make it tough. Chill the dough for 20 minutes to firm up.
- Prepare the Filling: Crumble 1 cup of feta cheese into a bowl. Add ½ cup of honey, 1 tsp dried oregano, and a pinch of cinnamon. Stir until the honey coats the feta evenly. The mixture should feel slightly sticky but not syrupy; if it’s too dry, add a teaspoon of water.
- Assemble the Pie: Spoon the feta‑honey mixture onto the dough, spreading it evenly. Fold the edges of the dough over the filling, creating a rustic edge that will crisp beautifully. Use a fork to crimp the edges, sealing the filling inside.
- Pre‑Bake the Crust: Preheat the oven to 350°F (175°C). Place the pie on a baking sheet lined with parchment. Bake for 15 minutes, or until the crust is lightly golden. This step ensures the dough is cooked through before the honey glaze is added.
- Apply the Honey Glaze: While the pie is still hot, brush the top with a thin layer of honey. The residual heat will caramelize the honey, giving it a golden sheen. Be careful not to use too much honey; a thin glaze is enough to create that glossy finish without overpowering the cheese.
- Finish Baking: Return the pie to the oven and bake for an additional 10 minutes, or until the glaze is caramelized and the edges are crisp. The pie should emit a sweet, buttery aroma that fills the kitchen.
- Rest the Pie: Remove the pie from the oven and let it rest for 5 minutes on a wire rack. This allows the filling to set and the honey glaze to firm up slightly, preventing it from sliding off when sliced.
- Serve: Slice the pie with a sharp knife, allowing the cheese to ooze slightly into each bite. Serve warm, perhaps with a side of fresh greens or a drizzle of olive oil for an extra Mediterranean touch. The contrast of the sweet glaze and salty cheese is a flavor explosion that will leave your guests begging for more.
That’s it — you did it. But hold on, I've got a few more tricks that'll take this to another level…
Insider Tricks for Flawless Results
The Temperature Rule Nobody Follows
Many bakers bake at a high heat to get a crisp crust, but the trick to melopita is a lower, steady temperature. Baking at 350°F ensures the cheese melts slowly, preventing a greasy mess. I’ve found that a slight temperature dip after the first 15 minutes keeps the crust from over‑browning while still caramelizing the honey.
Why Your Nose Knows Best
Before you pull the pie out of the oven, listen for that golden aroma that signals caramelization. If the honey has just begun to bubble and emit a sweet, buttery scent, it’s ready. Trust your nose—if it’s smelling like burnt sugar, give it a minute more.
The 5‑Minute Rest That Changes Everything
Resting the pie is not just a courtesy; it’s a science. The cheese needs time to set, and the honey glaze needs to firm up. Skipping this step can result in a runny center that spills over the sides. A quick 5‑minute rest is all you need to achieve a perfect bite.
Keep the Crust Flaky
When rolling the dough, always keep it cold. Warm dough tends to stick and becomes tough. A quick chill in the fridge for 10 minutes before rolling will keep the layers distinct.
Finish with a Sprinkle of Sea Salt
Right before serving, lightly sprinkle flaky sea salt on top. The salt crystals pop against the honey glaze, adding a satisfying crunch and a burst of flavor that elevates every bite.
Creative Twists and Variations
This recipe is a playground. Here are some of my favorite ways to switch things up:
Spinach & Feta Melopita
Swap half of the feta for sautéed spinach and a tablespoon of ricotta. The spinach adds earthiness, while ricotta keeps the filling creamy. This version is perfect for a lighter lunch.
Herb‑Infused Honey
Infuse the honey with fresh thyme or rosemary before drizzling it on the pie. The herbal notes create a fragrant, savory glaze that pairs beautifully with the cheese.
Smoked Paprika & Honey
Add a pinch of smoked paprika to the filling for a smoky depth. The paprika’s subtle heat contrasts with the honey’s sweetness, making it a great appetizer for a gathering.
Nutty Variation
Stir in chopped walnuts or pistachios into the filling. The nuts add crunch and a nutty flavor that complements the honey and feta.
Sweet & Savory Fusion
Replace the feta with goat cheese and drizzle a thin layer of balsamic glaze instead of honey. The tangy goat cheese and sweet balsamic create a modern twist that’s both elegant and unexpected.
Storing and Bringing It Back to Life
Fridge Storage
Cool the pie completely before refrigerating. Wrap it tightly in plastic wrap and store in the fridge for up to 3 days. When ready to serve, reheat in a preheated 350°F oven for 10 minutes until warmed through.
Freezer Friendly
Wrap the pie in foil and place it in a freezer bag. It can be frozen for up to 2 months. Thaw overnight in the fridge, then bake at 350°F for 15 minutes to restore crispness.
Best Reheating Method
For the freshest taste, reheat in a skillet over medium heat for 2 minutes on each side. This technique revives the crust’s crunch while keeping the filling silky. A tiny splash of water before reheating helps steam the cheese back to its original texture.