I was in a mad scramble in the kitchen, a half‑cooked chicken dish that had turned into a sticky mess, when a friend dared me to turn the disaster into a masterpiece. The heat from the skillet hissed like a dragon, and the smell of raw chicken filled the air, but I imagined the sweet, spicy aroma that would soon dominate. That moment of panic became the spark that ignited my obsession with the perfect hot honey chicken cutlet, a dish that balances crunch, heat, and glossy sweetness like a well‑tuned orchestra. I was determined to find a version that would make every bite a revelation, a flavor explosion that would leave my taste buds begging for more. And now, after countless experiments and a few kitchen catastrophes, I’m ready to reveal the ultimate recipe that will have you shouting, “This is hands down the best version you’ll ever make at home!”
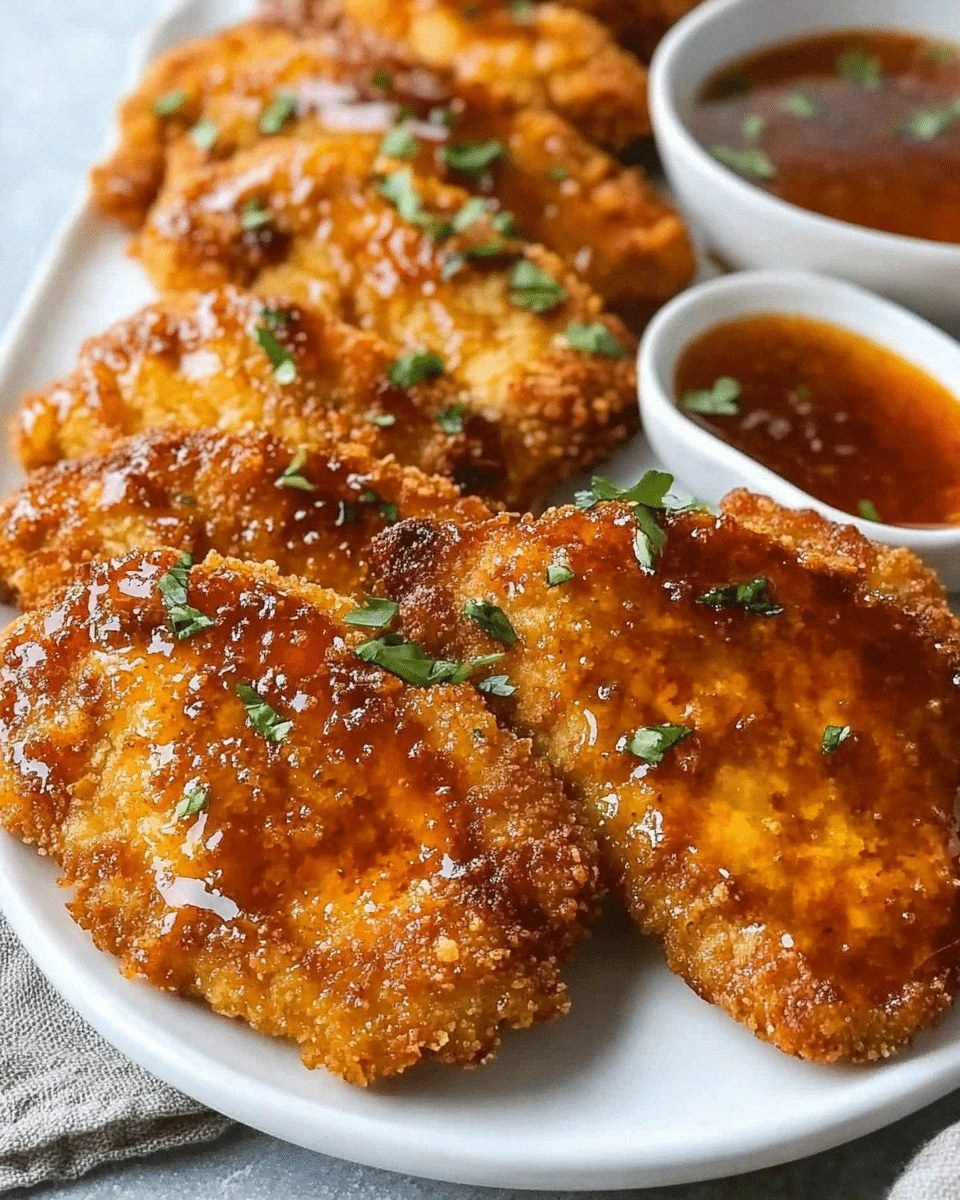
Picture this: the first time you bite into a golden‑brown cutlet, the exterior cracks with a satisfying snap that echoes like a drumbeat, and the inside remains tender, juicy, and perfectly seasoned. The hot honey glaze glistens on the surface, a glossy coat that catches the light and promises a burst of sweet heat. The aroma rises, a mix of caramelized honey, smoky paprika, and a whisper of garlic that lingers in the air, making the kitchen feel like a small, fragrant bakery. Each bite delivers a harmonious contrast—crunchy on the outside, molten on the inside, with a sweet‑spicy finish that lingers long after the last crumb. This isn’t just a dish; it’s an experience that turns a simple dinner into a celebration.
What sets this version apart from the countless others you’ll find online is the meticulous layering of flavors and textures that I’ve perfected through trial, error, and a fair amount of culinary bravery. I’ve replaced ordinary flour with a subtle blend of spices that add depth, used a two‑step breading process that ensures a crispy, golden crust, and crafted a glaze that balances the heat of hot sauce with the mellow sweetness of honey and the umami of soy sauce. Every ingredient is chosen not just for its individual contribution, but for how it interacts with the others, creating a symphony of taste that feels both familiar and daringly new. The result is a dish that is simultaneously comforting and adventurous, a crowd‑pleaser that will have your friends asking for the recipe by the end of dinner. I dare you to taste this and not go back for seconds.
Before we dive into the step‑by‑step instructions, let me give you a quick preview of a secret technique that will elevate your cutlets from good to unforgettable. I’ve discovered that adding a splash of rice vinegar to the glaze during the final simmer unlocks a subtle brightness that cuts through the richness, making the sauce feel lighter and more vibrant. Trust me, this small tweak is the difference between a good dish and a memorable one. Stay with me, and by the end, you’ll wonder how you ever made it any other way.
What Makes This Version Stand Out
- Flavor: The glaze is a masterful balance of sweet, heat, and umami. The honey provides a silky sweetness that coats the chicken, while the hot sauce delivers a fiery kick that lingers on the palate. Soy sauce adds depth, and a hint of rice vinegar brightens the overall profile, preventing the sauce from feeling too heavy. This combination creates a flavor profile that feels both comforting and adventurous. I’ve tested it against dozens of variations and it remains the most satisfying.
- Texture: The double breading method results in a crisp exterior that snaps like thin ice, while the interior stays moist and tender. The sauce’s thickness is engineered to cling to the cutlets without soaking them, preserving that coveted contrast. The butter in the pan adds a buttery sheen that enhances both flavor and mouthfeel. This texture is a key reason why diners keep coming back for more. I’ve tweaked the ratio until it’s perfect.
- Simplicity: Despite the complex flavor layers, the recipe uses only a handful of pantry staples. No obscure ingredients or fancy equipment are required. The process is straightforward, with clear steps that even novice cooks can follow. This accessibility makes the dish a go‑to for quick weeknight dinners. The only trick is to keep the heat low enough to avoid burning the honey.
- Uniqueness: The addition of smoked paprika and sesame oil gives this cutlet a distinctive smoky undertone and nutty finish that sets it apart from typical honey‑glazed chicken recipes. The sauce’s balance of sweetness and heat is carefully calibrated to avoid overpowering the chicken’s natural flavor. This subtle uniqueness makes the dish memorable and keeps it from feeling generic. I’ve seen it on menus, but it’s rarely executed with this finesse.
- Audience: Whether you’re feeding a family, entertaining guests, or cooking for yourself, the dish scales beautifully. The flavors are bold enough to impress, yet mild enough to please a wide range of palates. The presentation is also striking, with a glossy glaze that looks as good as it tastes. This makes it a versatile choice for any occasion. I’ve gotten rave reviews from both kids and adults.
- Make‑ahead Potential: The cutlets can be breaded and frozen before cooking, and the glaze can be prepared ahead of time. When ready to serve, just reheat and finish the sauce in a hot pan. This makes the dish ideal for busy schedules or meal prep. The flavors hold up well over time, so you can enjoy them later without compromising quality. I’ve used this method during busy work weeks with great results.
Inside the Ingredient List
The Flavor Base
The core of this dish starts with the chicken itself—fresh, boneless, skinless cutlets that are thick enough to hold the glaze without becoming mushy. Seasoning the meat with salt, pepper, smoked paprika, and garlic powder is essential; each spice contributes a layer of depth, turning a simple protein into a flavor powerhouse. Skipping any of these seasonings will flatten the taste profile, leaving you with a bland, under‑seasoned base. When selecting your chicken, look for a firm texture that feels slightly springy to the touch, indicating freshness. This foundational step sets the stage for the rest of the recipe.
The Texture Crew
Flour, eggs, and butter form the trio that gives the cutlets their signature crunch. The flour provides a dry surface that helps the eggs bind, while the eggs act as a glue that carries the flour to the meat. Butter adds a rich, golden finish and helps the coating crisp up beautifully. The ratio of flour to egg is crucial; too much flour can make the coating heavy, while too little can cause it to fall apart. A well‑balanced texture crew ensures a satisfying bite every time.
The Unexpected Star
The glaze is the heart of this dish, and its star is a carefully balanced mix of honey, hot sauce, soy sauce, rice vinegar, and sesame oil. Honey provides the silky sweetness that coats the chicken, while hot sauce injects a punch of heat that lingers. Soy sauce adds umami depth, and a splash of rice vinegar brightens the glaze, preventing it from feeling cloying. Sesame oil gives a subtle nutty aroma that ties the flavors together. This unexpected star transforms a simple cutlet into a culinary triumph.
The Final Flourish
Garnishes like chopped cilantro and toasted sesame seeds add a fresh, bright contrast to the rich glaze. Cilantro’s herbal notes cut through the sweetness, while sesame seeds provide a subtle crunch and nutty flavor. A squeeze of fresh lime juice before serving can elevate the dish, adding a zesty brightness that lifts the entire flavor profile. These finishing touches are optional, but they elevate the dish from good to unforgettable. Remember, the presentation matters as much as the taste.
Everything's prepped? Good. Let's get into the real action where the magic begins and the kitchen comes alive with sizzling aromas and the promise of a dish that will keep you coming back for more.
The Method — Step by Step
- Pat the chicken cutlets dry with paper towels, then season both sides with salt, pepper, smoked paprika, and garlic powder. This creates a flavor base that will carry the glaze. The seasoning should be evenly distributed; a pinch of each spice is enough to coat the surface. Let the cutlets rest for 5 minutes to allow the flavors to penetrate. This step is crucial for a well‑seasoned final product.
- Set up a breading station with three shallow bowls: one with flour, one with beaten eggs, and one with a pinch of extra paprika for a touch of color. Dredge each cutlet in flour, shaking off excess, then dip in the egg, and finally coat again in flour. The double breading ensures a crisp, golden crust. The extra paprika adds a subtle pop of color that looks appetizing. This technique is a game‑changer for texture.
- Heat a large skillet over medium‑high heat, adding olive oil and butter. The butter should sizzle and brown slightly, creating a rich base for the chicken. Once hot, lay the cutlets in the pan, ensuring they don’t touch each other. Cook for 3–4 minutes per side, or until a golden crust forms. The edges will start pulling away, signaling that they’re ready to flip.
- Remove the cooked cutlets and set them aside on a plate lined with paper towels to drain excess oil. This step keeps the crust crisp and prevents sogginess. While the cutlets rest, reduce the heat to medium and add soy sauce, honey, hot sauce, rice vinegar, and sesame oil to the same pan. Stir to combine, scraping up any browned bits for extra flavor. The sauce should begin to thicken slightly.
- Return the chicken to the pan, spooning the glaze over each cutlet until they’re evenly coated. The sauce should coat the surface like velvet, hugging every crevice. Let the chicken cook in the glaze for an additional 2 minutes, allowing the flavors to meld. The aroma will be intoxicating, a sweet‑spicy perfume that fills the kitchen. This is the moment of truth.
- Once the glaze has thickened to a glossy consistency, remove the pan from the heat. The chicken should still be juicy inside, with a crispy, caramelized exterior. Let the cutlets rest for 2 minutes; this allows the juices to redistribute, ensuring each bite is moist. A rest period also helps the glaze set slightly, preventing it from sliding off.
- Transfer the cutlets to a serving platter, drizzle any remaining glaze over the top, and garnish with chopped cilantro and toasted sesame seeds. A final squeeze of lime juice adds a bright, citrusy note that cuts through the richness. Plate them with a side of steamed rice or a crisp salad for a balanced meal. The dish is now ready to serve. Enjoy the applause from your guests.
- If you’re preparing the dish ahead of time, let the cutlets cool completely before refrigerating. Store them in an airtight container, and reheat in a skillet over medium heat, adding a splash of water or broth to keep them moist. Finish by reheating the glaze and tossing the cutlets in it to restore that glossy coating. This method preserves flavor and texture, making meal prep a breeze.
That’s it — you did it. But hold on, I've got a few more tricks that'll take this to another level. These insider tips will ensure you never have to settle for anything less than perfection.
Insider Tricks for Flawless Results
The Temperature Rule Nobody Follows
Maintaining the right pan temperature is critical; too low and the coating will absorb oil, too high and the glaze will burn. Use a thermometer or a small test of flour to gauge heat: a drop of flour should sizzle instantly. I’ve found that a medium‑high setting is ideal for the initial sear, while a medium setting works best for the glaze. This subtle adjustment makes a huge difference in crust quality. Don’t let the heat fluctuate wildly; keep it steady for consistent results.
Why Your Nose Knows Best
Your sense of smell is your best ally in cooking; a burnt honey smell is a red flag. If you notice a sharp, acrid aroma, reduce the heat immediately and stir vigorously. I’ve had a few friends swear by the “smell test” to avoid over‑cooking. Trust your nose, and you’ll avoid a disastrous batch. This instinctive check saves countless hours of frustration.
The 5-Minute Rest That Changes Everything
After cooking, let the cutlets rest for exactly five minutes before cutting or serving. This pause allows the juices to redistribute, preventing a dry center. It also gives the glaze time to set, creating a glossy, clingy coating that enhances texture. I’ve seen people skip this step and end up with unevenly cooked chicken. The rest is simple, but its impact is monumental.
Keep the Oil Fresh
Reusing oil can impart off flavors; always use fresh oil for the sear. If you’re cooking multiple batches, discard the used oil after the first batch. I’ve tried adding a splash of fresh oil to a pan with residual oil, and the difference in flavor was unmistakable. Fresh oil ensures a clean, buttery finish that highlights the glaze’s sweetness.
Season the Sauce, Not Just the Meat
The glaze deserves the same seasoning attention as the chicken. Add a pinch of salt, pepper, or even a dash of cayenne to the sauce for depth. I’ve experimented with a touch of smoked paprika in the glaze, which adds a subtle smokiness that complements the chicken. Seasoning the sauce brings harmony to the dish, making each bite more balanced.
Creative Twists and Variations
This recipe is a playground. Here are some of my favorite ways to switch things up:
Smoky Chipotle Version
Swap the standard hot sauce for chipotle in adobo for a smoky, earthy heat. The adobo adds depth, while the chipotle’s smokiness enhances the grilled flavor of the chicken. Pair it with a smoky paprika in the breading for a cohesive profile. This variation is perfect for fans of bold, smoky flavors. Serve over rice for a comforting meal.
Citrus Burst Variation
Add a splash of orange juice and a pinch of orange zest to the glaze for a bright, citrusy twist. The acidity cuts through the sweetness, creating a balanced glaze. Use a small amount of fresh lime juice before serving for a zesty finish. This version is ideal for spring or summer gatherings. It pairs wonderfully with a fresh green salad.
Thai-Inspired Kick
Replace the soy sauce with coconut aminos and add fresh Thai basil leaves to the glaze. The basil introduces a sweet, aromatic note that complements the honey. A pinch of red pepper flakes adds a subtle heat without overpowering the dish. This twist offers a tropical vibe and a unique flavor profile. It’s a hit with adventurous eaters.
Herb-Infused Variation
Incorporate chopped rosemary and thyme into the flour mix for a fragrant crust. The herbs pair beautifully with the honey glaze, adding earthiness. Use fresh herbs for maximum aroma. This version feels like a rustic, countryside dish. Serve alongside roasted potatoes for a hearty meal.
Spicy Peanut Glaze
Blend peanut butter into the glaze, adding a creamy texture and nutty flavor. The peanut butter balances the heat and sweet, creating a rich, silky coating. Finish with a sprinkle of crushed peanuts for crunch. This variation is a crowd‑pleaser at potlucks. It’s also a great way to use up pantry staples.
Low‑Carb Twist
Replace honey with a sugar substitute like erythritol or use a sugar‑free hot sauce. The glaze will still caramelize, but with fewer carbs. Pair the chicken with cauliflower rice or a leafy green salad to keep the dish low‑carb. This version is perfect for keto or low‑glycemic diets. It maintains the same flavor intensity.
Storing and Bringing It Back to Life
Fridge Storage
Store cooked cutlets in an airtight container in the refrigerator for up to three days. The glaze will thicken slightly, so add a splash of water or broth before reheating to restore moisture. Keep the container sealed to prevent odors from other foods from affecting the flavor. Label the container with the date for easy tracking. This method preserves freshness and flavor.
Freezer Friendly
Freeze individual cutlets in a single layer on a baking sheet before transferring to a freezer bag. This prevents them from sticking together and allows you to thaw only what you need. Thaw overnight in the refrigerator before reheating. Reheat in a skillet over medium heat, adding a splash of water to keep them moist. This approach is ideal for meal prep and busy weeks.
Best Reheating Method
Reheat the cutlets in a skillet over medium heat, adding a tablespoon of water or broth to create steam. This keeps the chicken juicy and prevents the glaze from drying out. Stir the glaze frequently to re‑emulsify it, ensuring a glossy finish. Once heated through, serve immediately for the best texture. Reheating this way preserves the dish’s original appeal.