I was standing in my kitchen on a rainy Saturday, staring at a half‑empty pantry and a craving that felt like a tiny, insistent drumbeat in my head. I had tried a dozen chocolate bar recipes that either turned out dry as a desert or so gooey they slipped off the pan like a mischievous otter. Then my roommate dared me to make something that would make her forget her own name – “Make a bar so fudgy it could melt steel,” she shouted over the hiss of the kettle. I laughed, rolled up my sleeves, and decided to turn that dare into a culinary love‑letter, because honestly, who can resist the promise of chocolate that sticks to your teeth like a sweet, velvety secret?
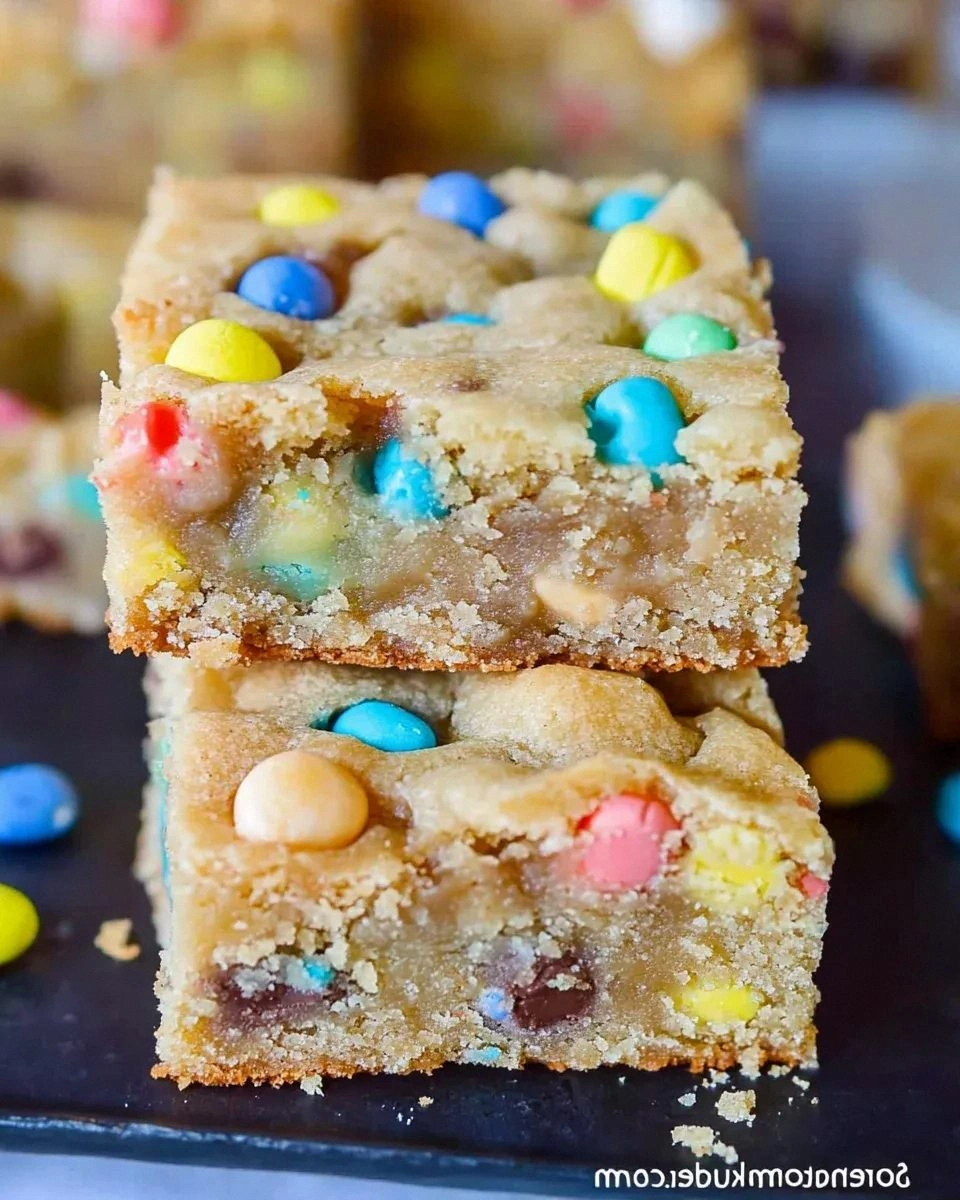
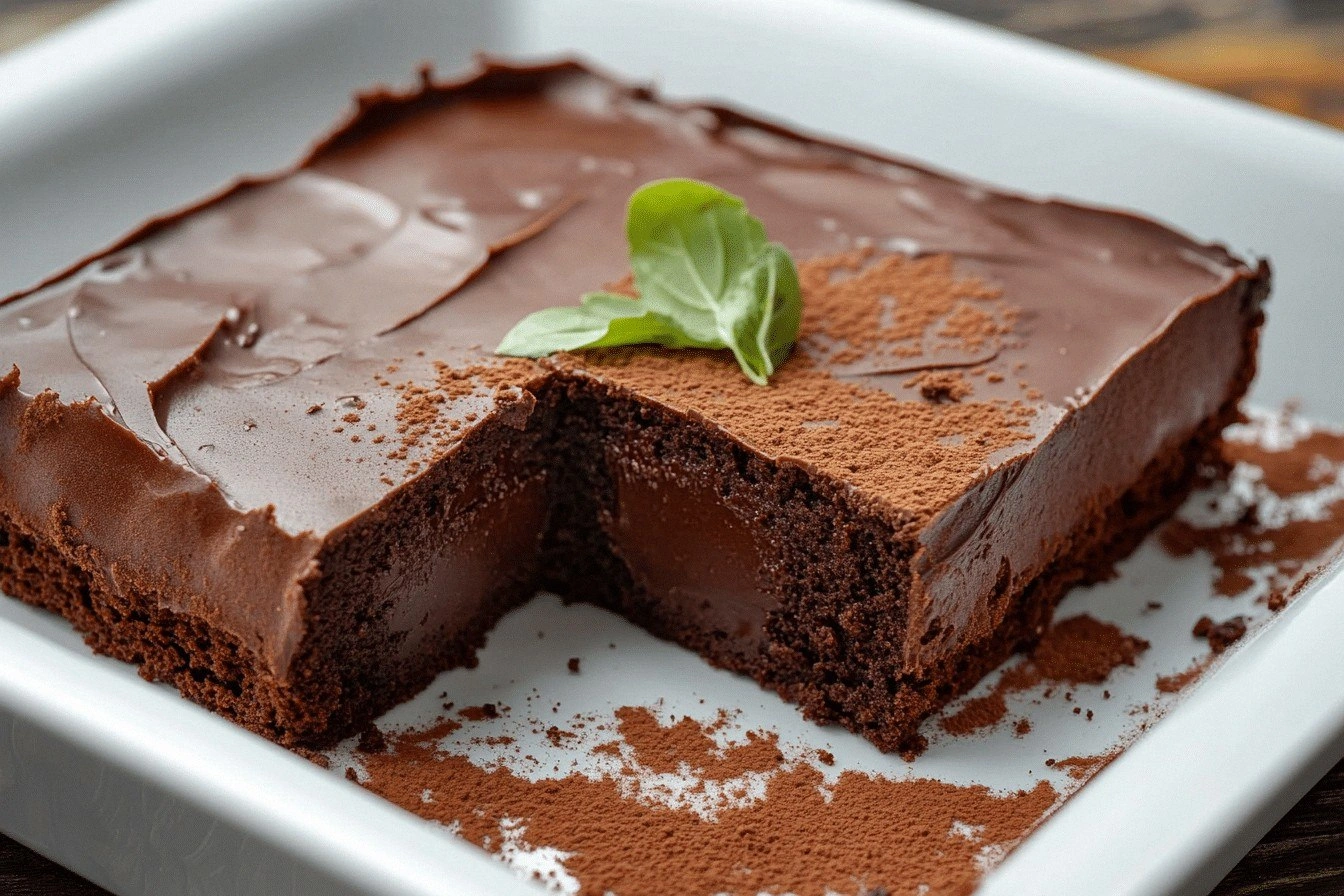
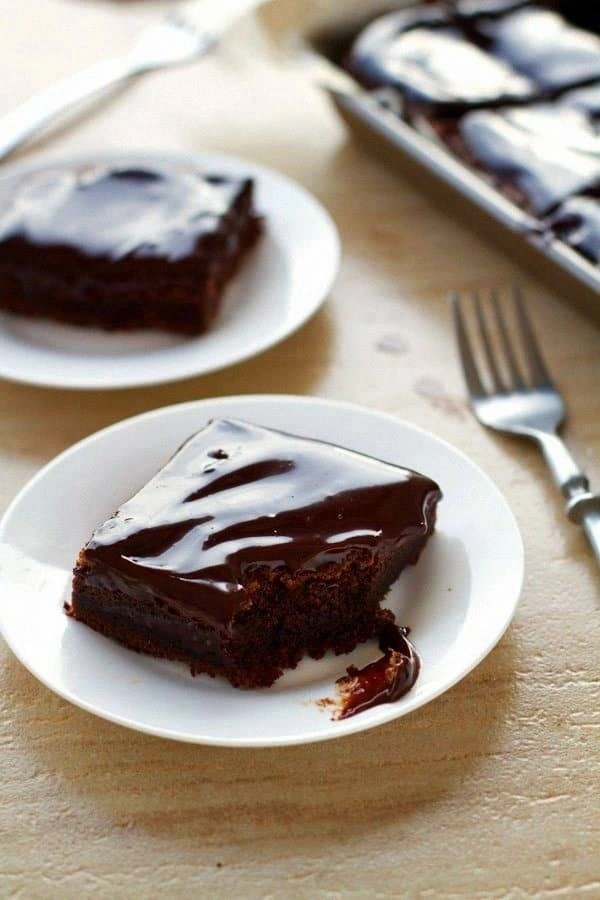
Picture this: the oven door swings open and a warm, chocolate‑laden cloud billows out, hugging the kitchen in a sweet, almost intoxicating perfume. The batter, glossy and thick, spreads itself across the pan like a dark river, its surface shimmering with tiny bubbles that pop like fireworks. As it bakes, the edges start to pull away, forming a crisp border that cracks just enough to reveal the molten heart inside – a contrast so perfect it feels like biting into a midnight sky with a sunrise hidden beneath. When you finally cut a square, the fork slides through with a soft sigh, and the bar lifts, glossy and glossy, promising a bite that’s simultaneously dense, airy, and impossibly smooth.
What makes this version the ultimate game‑changer? It’s the marriage of three secret weapons: a splash of espresso that deepens the cocoa, a touch of buttermilk that keeps the crumb tender, and a double‑sugar system that balances sweetness with a caramel‑like depth. Most recipes either skimp on moisture or drown you in sugar; this one walks the tightrope with the poise of a seasoned acrobat. I’ll be honest — I ate half the batch before anyone else got a chance to try it, and that’s a confession worth sharing because it proves just how addictive these bars truly are.
Let me walk you through every single step — by the end, you’ll wonder how you ever made chocolate bars any other way. Okay, ready for the game‑changer? This next part? Pure magic. Stay with me here — this is worth it.
What Makes This Version Stand Out
- Fudgy Texture: The combination of melted butter, buttermilk, and a precise ratio of sugars creates a crumb that’s dense yet surprisingly tender, like biting into a cloud made of chocolate.
- Deep Chocolate Flavor: Unsweetened cocoa paired with a shot of espresso amplifies the cocoa notes, making the flavor sing louder than a choir of baristas.
- Simple Prep: Only a handful of steps and one bowl after the dry ingredients are whisked – perfect for busy weeknights or lazy weekends.
- Versatile Crowd‑Pleaser: Whether you’re feeding picky teens or sophisticated adults, these bars hit the sweet spot every single time.
- Ingredient Quality: Using high‑quality cocoa powder and real butter makes a world of difference; the result feels luxurious without being pretentious.
- Make‑Ahead Friendly: The bars keep their moisture for up to three days in the fridge and freeze beautifully, so you can prep ahead for parties.
- Balanced Sweetness: A blend of granulated and brown sugar adds depth, preventing the bars from becoming cloyingly sweet.
- Easy Scaling: The recipe scales cleanly, thanks to the serving adjuster built into the card below, so you can double for a crowd or halve for a quiet night.
Inside the Ingredient List
The Flavor Base
Cocoa powder is the heart of any chocolate bar, but not all cocoa is created equal. I use a Dutch‑process, unsweetened cocoa that delivers a deep, almost earthy flavor without bitterness. Skipping the cocoa or swapping it for a sweetened variety will flatten the taste profile, leaving you with a bland bar that feels more like a cake than a true chocolate experience. If you can’t find Dutch‑process, a good quality natural cocoa works, but add a pinch more sugar to balance the acidity.
The Texture Crew
Butter, melted and cooled, provides richness, while buttermilk introduces acidity that tenderizes the gluten network, resulting in that melt‑in‑your‑mouth crumb. Eggs act as emulsifiers, binding the fats and liquids together, and the dual sugars – granulated for sweetness and brown for caramel notes – create a moist interior and a slight crisp on the edges. If you replace buttermilk with regular milk, the bars will be denser and lack that subtle tang that lifts the chocolate.
The Unexpected Star
A tablespoon of espresso dissolved in two teaspoons of hot water is the secret weapon that most recipes overlook. The caffeine doesn’t make the bars jittery; instead, it deepens the cocoa, giving the flavor a sophisticated, almost wine‑like complexity. If you’re not a coffee fan, you can swap the espresso for a teaspoon of instant coffee granules – the effect is the same.
The Final Flourish
Chocolate chips folded in at the end melt into pockets of gooey goodness, creating surprise bursts of texture. A pinch of sea salt sprinkled on top before baking amplifies the chocolate’s sweetness and adds a subtle crunch. Finally, a light dusting of powdered sugar after cooling gives a pretty finish without altering the flavor.
Everything's prepped? Good. Let's get into the real action...
The Method — Step by Step
Preheat your oven to 350°F (175°C) and line a 9×13‑inch baking pan with parchment paper, leaving enough overhang to lift the bars out later. While the oven warms, the kitchen fills with a faint buttery aroma that hints at what’s to come. This is the moment where you set the stage for a flawless bake; a properly heated oven ensures the bars rise evenly and develop that coveted crust.
In a large mixing bowl, whisk together 2 cups of all‑purpose flour, 3/4 cup unsweetened cocoa powder, 1½ teaspoons baking powder, ½ teaspoon baking soda, and 1 teaspoon salt. I dare you to taste this dry mix – the cocoa should smell earthy and slightly bitter, a sign of quality. Sifting twice not only removes lumps but also incorporates air, which is crucial for that light‑yet‑dense texture.
In a separate saucepan, melt 1 cup of unsalted butter over low heat, then stir in 1½ cups granulated sugar and 1 cup packed brown sugar until the mixture glistens. Once the sugars dissolve, remove from heat and let it cool for a minute. This step creates a glossy, caramel‑like base that will coat the dry ingredients and lock in moisture.
Add 4 large eggs, one at a time, beating well after each addition, then stir in 2 teaspoons vanilla extract and the espresso mixture (1 tablespoon espresso dissolved in 2 teaspoons hot water). The batter should look thick and glossy, with a deep mahogany hue. This is where the magic happens – the espresso deepens the chocolate flavor without making the bars taste like coffee.
Gradually fold the dry mixture into the wet batter, alternating with 1 cup of buttermilk. Start and end with the dry ingredients, mixing just until no flour streaks remain. Over‑mixing can develop gluten, leading to a tough bar, so stop as soon as the batter looks homogenous and slightly lumpy.
Stir in 1 cup of semi‑sweet chocolate chips and, if you like, a pinch of sea salt. The chips will melt into pockets of molten chocolate, creating delightful surprise bites.
Kitchen Hack: Toss the chocolate chips with a teaspoon of flour before folding them in; this prevents them from sinking to the bottom of the pan.Pour the batter into the prepared pan, smoothing the top with a spatula. The surface should be glossy and thick, not spreading too thin. Place the pan in the oven and bake for 30‑35 minutes, or until a toothpick inserted into the center comes out with a few moist crumbs but no wet batter. That sizzle when it hits the pan? Absolute perfection.
- Once the timer dings, turn off the oven, crack the door open, and let the pan sit for 5 minutes. This gentle cooling prevents the edges from cracking too sharply, preserving that perfect contrast between crust and interior.Watch Out: Do not overbake. The bars will continue to set as they cool; pulling them out too early results in a soggy center, while overbaking makes them dry and crumbly.
Remove the pan from the oven, lift the parchment to transfer the whole slab onto a wire rack, and let it cool completely before cutting. While it cools, the bars will firm up, making clean cuts possible. Use a sharp knife warmed under hot water for each cut – the heat helps slice through the glossy top without dragging crumbs.
Dust the finished bars with a light veil of powdered sugar, slice into squares or rectangles, and serve. The moment you bite into that first square, you’ll hear the faint crack of the crust followed by the sigh of the fudgy interior. And now the fun part – watching your friends scramble for seconds. That’s it — you did it. But hold on, I’ve got a few more tricks that’ll take this to another level...
Insider Tricks for Flawless Results
The Temperature Rule Nobody Follows
Never bake chocolate batter at a temperature lower than 350°F. Lower temps cause the butter to separate, leading to a greasy crumb. I once tried 325°F because my oven’s thermostat was off, and the result was a dense, oily slab that fell apart on the plate. Keep the oven hot, and you’ll get that crisp edge and tender middle that defines a perfect bar.
Why Your Nose Knows Best
Around the 20‑minute mark, you’ll notice a sweet, toasty aroma wafting from the oven. That’s your cue to start checking the bars. If the scent is strong and the edges are pulling away, the interior is likely set. Trust your nose more than the clock – ovens vary, and the scent is a reliable indicator of doneness.
The 5‑Minute Rest That Changes Everything
After you pull the pan from the oven, let it rest with the door slightly ajar for exactly five minutes. This short steam‑break allows the interior to finish cooking gently, preventing a gummy center. Skipping this step is a common mistake; I once sliced the bars hot and they fell apart like a chocolate‑smeared puzzle.
The Double‑Sugar Balance
Using both granulated and brown sugar isn’t just for flavor depth; it also influences texture. Granulated sugar encourages a slight crispness, while brown sugar adds moisture and a subtle caramel undertone. If you replace brown sugar with more white, the bars become too dry; if you go all brown, they become overly soft and may not hold their shape.
The Cool‑Down Flip
When the slab has cooled for about 15 minutes, gently flip it onto a cutting board using the parchment overhang. This prevents the bottom from getting soggy from steam condensation. A friend once tried to cut the bars while still warm and ended up with mushy pieces that stuck to the knife. The flip technique gives you clean edges and a uniform crumb.
Creative Twists and Variations
This recipe is a playground. Here are some of my favorite ways to switch things up:
Mint‑Infused Madness
Add ½ teaspoon of peppermint extract to the wet mixture and fold in a handful of crushed peppermint candies after the chocolate chips. The cool mint cuts through the richness, making it perfect for holiday gatherings.
Nutty Crunch
Stir in ¾ cup of toasted chopped hazelnuts or almonds just before baking. The nuts add a buttery crunch that contrasts beautifully with the fudgy interior, and they bring a subtle earthiness that complements the espresso.
White Chocolate Swirl
Melt ½ cup of white chocolate and swirl it into the batter using a skewer before baking. The sweet, creamy ribbons create a visual spectacle and a flavor duet that’s both bright and indulgent.
Spicy Chili Kick
Add ¼ teaspoon of cayenne pepper and a pinch of smoked paprika to the dry ingredients. The subtle heat awakens the palate and pairs surprisingly well with the deep chocolate, perfect for adventurous eaters.
Berry Burst
Fold in 1 cup of fresh raspberries or frozen mixed berries after the batter is mixed. The berries release a slight tartness that cuts through the richness, and the pockets of fruit burst with juicy flavor when you bite in.
Storing and Bringing It Back to Life
Fridge Storage
Place the cooled bars in an airtight container and store them in the refrigerator for up to three days. The cool environment preserves the fudgy texture and prevents the chocolate from blooming.
Freezer Friendly
Wrap each bar individually in parchment, then seal the whole batch in a zip‑top freezer bag. They’ll keep for up to two months. When you’re ready to eat, let them thaw at room temperature for 20 minutes, then give them a quick microwave zap (10‑15 seconds) to revive the melt‑in‑your‑mouth softness.
Best Reheating Method
To bring a refrigerated bar back to its prime, place it on a microwave‑safe plate, sprinkle a tiny splash of water (about a teaspoon) around the edges, and microwave for 8‑10 seconds. The steam generated revives the fudgy interior without drying it out.