I was staring at a pile of sweet potatoes in my kitchen, feeling the weight of the whole family’s expectations for tonight’s dinner. The last time I tried to whip up a quick side dish, I ended up with soggy, mushy wedges that tasted like a failed experiment in a science lab. I was determined that this time, the sweet potatoes would rise like golden soldiers, each bite offering a satisfying crunch that would make every guest ask for more. The moment I tossed the first wedge into the hot oven, the air filled with a caramelized aroma that made my mouth water and my heart race.
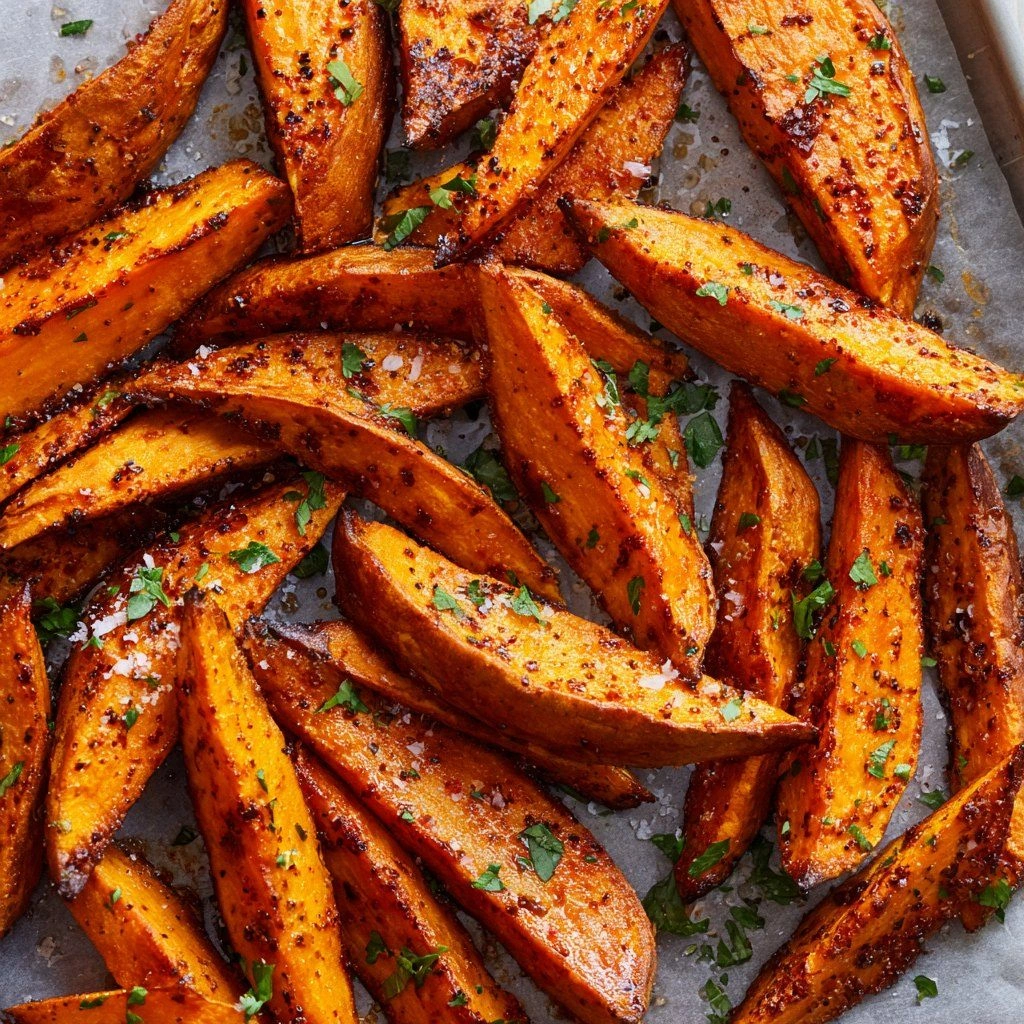
Picture this: a sheet of wedges glistening under the oven light, their edges crisping to a buttery amber while the inside stays tender and sweet. The sound of the first crackle as the heat hits the surface is a small, satisfying pop that feels like a secret handshake between you and your kitchen. The texture is a delightful contrast—outside a brittle shell, inside a cloud of soft, almost buttery flesh. And the flavor? It’s a sweet, smoky, slightly peppery dance that lingers on the tongue, leaving a subtle hint of rosemary and a whisper of garlic. I swear, you can almost taste the sunshine that each slice of sweet potato holds.
What sets this recipe apart from the countless others you’ve seen online is that it doesn’t rely on a single seasoning or a quick toss. It’s a layered approach that builds flavor at every stage—from the initial brine to the final sprinkle of herbs. The technique of parboiling before roasting gives the wedges a head start, ensuring they stay fluffy inside while the outside gets that coveted crunch. The secret is in the timing: a few minutes in the pot, a dash of oil, and a precise oven temperature that turns the sweet potatoes into a work of edible art. If you’ve ever struggled to get sweet potato wedges that aren’t either raw or overdone, this is the solution you’ve been searching for.
I’ll be honest—after the first batch, I couldn’t resist taking a bite before anyone else got a chance. The crunch was so satisfying that I almost swallowed the entire plate, and my friends were left staring at me like I’d performed a culinary miracle. This isn’t just another side dish; it’s a confidence booster for any kitchen. Imagine pulling this out of the oven, the whole kitchen smelling incredible, and knowing that your guests will be raving about the texture and flavor for days. And that’s just the beginning—there are a few twists that will elevate this dish from good to unforgettable.
What Makes This Version Stand Out
- Flavor Depth: The combination of a sweet potato brine, a splash of maple syrup, and a hint of smoked paprika creates layers that unfold with every bite, rather than a single, flat taste.
- Crispy Perfection: The parboiling step removes excess moisture, allowing the oven to crisp the exterior to a golden‑brown finish that shatters like thin ice.
- Time Efficiency: While it sounds elaborate, the method takes less than 45 minutes from start to finish, making it ideal for weeknight dinners.
- Ingredient Quality: Using organic sweet potatoes and a high‑quality olive oil ensures that the natural sweetness and earthy undertones shine through.
- Visual Appeal: The wedges are cut into uniform, fan‑shaped pieces that stack neatly, creating a platter that looks as good as it tastes.
- Versatile Base: The seasoning blend can be tweaked for sweet, savory, or spicy profiles, so you can adapt it for any meal.
- Make‑Ahead Friendly: The wedges can be pre‑cooked, cooled, and stored in the fridge for up to 48 hours, then reheated to crispness in under 10 minutes.
- Health Conscious: Despite their indulgent texture, these wedges are low in calories and high in beta‑carotene, making them a nutritious side.
Alright, let's break down exactly what goes into this masterpiece…
Inside the Ingredient List
The Flavor Base
At the heart of these wedges is a simple yet powerful brine that pre‑season the sweet potatoes before they hit the heat. A cup of warm water, a tablespoon of sea salt, a tablespoon of brown sugar, and a splash of apple cider vinegar combine to create a sweet‑savory bath that infuses each wedge with flavor. The sugar not only balances the natural sweetness but also helps caramelize the exterior. If you’re watching sodium, reduce the salt to half a teaspoon and increase the vinegar slightly to maintain acidity.
The brine also helps to soften the outer layer, allowing the oven to create that crisp crust without burning the inside. Skipping this step will leave you with uneven cooking and a less complex taste. For a vegan option, replace the apple cider vinegar with lemon juice; it gives a bright, zesty kick that pairs wonderfully with the sweet potato.
The Texture Crew
Parboiling is the secret to achieving that airy interior. After the brine, you boil the wedges for three minutes, just enough to start the softening process but not so long that they become mushy. This brief soak removes excess starch, which would otherwise create a gummy center. The key is to use a pot big enough so the wedges float and don’t touch the bottom, ensuring even cooking.
Once boiled, you drain and pat the wedges dry with a clean towel. Moisture is the enemy of crispness, so it’s critical to remove every droplet before tossing them in oil. A quick squeeze of a paper towel works wonders, but if you’re in a hurry, a few minutes of air‑drying will suffice.
The Unexpected Star
Maple syrup is the twist that elevates these wedges from ordinary to extraordinary. A tablespoon of pure maple syrup is folded into the oil and spice mixture, adding a subtle caramel flavor that complements the natural sweetness of the potato. The syrup also aids in browning, giving the wedges a deeper, richer hue. If you’re looking for a low‑sugar version, substitute agave nectar or a dash of honey, but keep the quantity modest to avoid overpowering the dish.
The maple syrup is not just for flavor—it creates a glossy finish that makes the wedges look appetizing. The glaze also helps the spices adhere to the surface, ensuring every bite is coated with seasoning. Without it, the wedges might taste bland, and the crust would be dull.
The Final Flourish
The seasoning blend is where the flavor really shines. A teaspoon of smoked paprika, half a teaspoon of garlic powder, a pinch of cayenne pepper, and a tablespoon of fresh rosemary provide a complex, savory layer that balances the sweet base. The rosemary adds an earthy aroma, while the smoked paprika introduces a subtle smokiness that pairs beautifully with the maple glaze. Adjust the cayenne to your heat tolerance; even a small amount can create a noticeable kick.
After tossing the wedges in the seasoned oil mixture, you spread them in a single layer on the prepared baking sheet. Make sure the wedges aren’t crowded; otherwise, they’ll steam instead of roast. The final sprinkle of coarse sea salt right before baking enhances the crust and brings out the natural sugars in the potato.
Everything's prepped? Good. Let's get into the real action…
The Method — Step by Step
- First, peel the sweet potatoes and cut them into even wedges, roughly 1.5 inches thick. Uniformity is key to ensuring each piece cooks at the same rate. If you’re short on time, use a mandoline slicer for precise cuts. The wedges should resemble small fans, with the widest part facing outward for maximum surface area.
- In a large bowl, whisk together the warm water, sea salt, brown sugar, and apple cider vinegar to create the brine. Add the sweet potato wedges to the mixture, ensuring they are fully submerged. Let them soak for 15 minutes; this allows the sugars to start working on the surface.
- Heat a pot of salted water to a gentle boil and add the brined wedges. Boil for exactly three minutes—no more, no less—to start the softening process without losing texture. Once done, drain immediately and rinse under cold water to stop the cooking.
- Pat the wedges dry with paper towels, making sure no moisture remains. This step is crucial; any remaining dampness will prevent crisping. Place the wedges on a large baking sheet lined with parchment paper, spacing them evenly to avoid overcrowding.
- In a small bowl, combine olive oil, maple syrup, smoked paprika, garlic powder, cayenne pepper, and fresh rosemary. Whisk until the mixture is smooth and the spices are fully incorporated. The maple syrup should coat the oil, giving it a glossy sheen.
- Drizzle the seasoned oil mixture over the wedges, ensuring each piece is evenly coated. Toss gently to distribute the glaze uniformly. If you’re a fan of a thicker coating, double the oil mixture and repeat the drizzle.
- Preheat your oven to 425°F (220°C). Place the baking sheet on the middle rack and roast the wedges for 25 minutes. Flip them halfway through at the 12‑minute mark to promote even browning. The edges should start pulling away and turning a deep amber.
- After 25 minutes, remove the sheet and sprinkle a final pinch of coarse sea salt over the wedges. This last touch enhances the crust’s crunch and brings out the sweet flavors. Return the sheet to the oven for an additional 5 minutes to finish the crisping process.
- Once done, let the wedges cool on a rack for a few minutes. This resting period allows the steam to escape, preventing sogginess. Serve immediately with a side of tangy aioli or your favorite dipping sauce.
- If you’re craving a touch of extra crunch, sprinkle a handful of panko breadcrumbs over the wedges during the last 5 minutes of baking. The breadcrumbs will add a nutty texture that complements the sweet potato’s natural flavor.
That’s it — you did it. But hold on, I've got a few more tricks that'll take this to another level…
Insider Tricks for Flawless Results
The Temperature Rule Nobody Follows
Many cooks bake at 400°F, but the sweet potato’s natural sugars caramelize best at 425°F. The higher temperature creates a quick sear that locks in moisture while forming a crisp exterior. If you’re using a convection oven, reduce the temperature by 25°F to avoid over‑browning. Remember, the goal is a golden crust, not a burnt one.
Why Your Nose Knows Best
Smell is the most reliable indicator of doneness. As the wedges bake, you’ll notice a sweet, nutty aroma that signals the sugars are caramelizing. If the scent is faint, give them a few more minutes; if it’s overpowering, take them out immediately to prevent burning.
The 5‑Minute Rest That Changes Everything
Allowing the wedges to rest on a rack for 5 minutes after baking lets the steam escape. This small pause prevents the wedges from becoming soggy and preserves the crunch. During this time, the flavors also settle, making each bite more harmonious.
Use a Parchment‑Lined Sheet for Easy Cleanup
The parchment paper prevents the wedges from sticking to the sheet, allowing you to slide them off with ease. It also absorbs excess oil, reducing the need for extra cleaning. If you’re a fan of a rustic look, skip the parchment, but be prepared for a more labor‑intensive cleanup.
Add a Splash of Water to Reheat
When reheating leftovers, drizzle a teaspoon of water over the wedges before microwaving. The moisture will steam the wedges, restoring crispness. Then, pop them in a hot skillet for a minute to crisp the exterior again.
Creative Twists and Variations
This recipe is a playground. Here are some of my favorite ways to switch things up:
Spicy Sriracha Crunch
Swap the maple syrup for a tablespoon of sriracha and add a dash of lime juice. The heat from the sriracha cuts through the sweetness, while the lime adds brightness. Serve with a cool cucumber yogurt dip to balance the spice.
Mediterranean Herb Mix
Replace smoked paprika with oregano and add chopped kalamata olives into the seasoning mix. The olives provide a briny counterpoint to the sweet potato’s natural sugars. Finish with a drizzle of extra‑virgin olive oil and a squeeze of lemon.
Cheesy Parmesan Finish
During the last 5 minutes of baking, sprinkle grated Parmesan over the wedges. The cheese melts into a golden crust, adding a nutty, savory layer. Pair with a garlic aioli for a decadent side.
Curry‑Infused Sweetness
Add a teaspoon of curry powder to the oil mixture and a pinch of turmeric for color. The warm spices bring depth and a subtle earthiness. Serve with a coconut‑based sauce to tie the flavors together.
Almond Butter Glaze
Blend almond butter with a touch of maple syrup and a splash of soy sauce. Toss the wedges in this glaze for a nutty, umami‑rich coating. The almond butter adds a creamy texture that contrasts nicely with the crisp exterior.
Storing and Bringing It Back to Life
Fridge Storage
Cool the wedges completely before storing them in an airtight container. They’ll stay fresh for up to 48 hours in the refrigerator. When ready to eat, reheat them in a 400°F oven for 10 minutes, or until they’re hot and crispy again.
Freezer Friendly
For longer storage, freeze the cooled wedges on a parchment‑lined tray for 2 hours, then transfer to a freezer bag. They can be stored for up to 3 months. To reheat, bake at 425°F for 15 minutes or until crispy.
Best Reheating Method
The oven is your best friend when it comes to reheating. Unlike the microwave, the oven restores the crunch by allowing the surface to dry out slightly. If you’re short on time, a quick 2‑minute burst in a hot skillet will also revive the texture.