I remember the night I tried to make a cake that would have made the entire kitchen feel like a disaster zone. The batter had turned into a lumpy, rubbery mess, the oven temperature had been off by 25 degrees, and the cake itself had collapsed like a bad soufflé. I stared at that sad, half-baked thing and thought, “This is the last time I’ll ever call this a cake.” That moment sparked a quest that turned into a culinary revelation, a cake that not only survived the oven but also became the star of every dinner party I ever hosted.
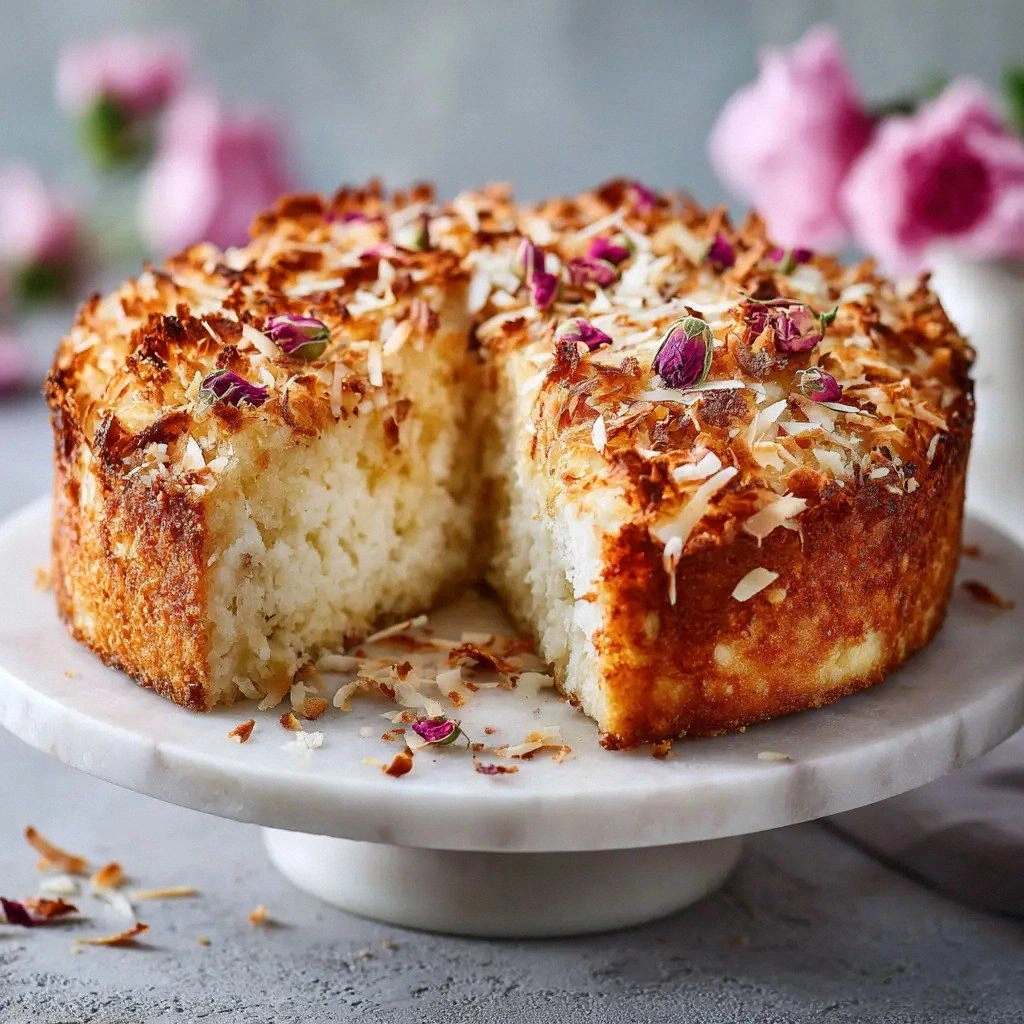
Picture this: a golden, caramelized crust that cracks open to reveal a cloud of moist, airy crumb that practically dissolves in your mouth. The aroma is a gentle, sweet coconut haze that mingles with a faint buttery undertone, like a tropical breeze passing through a sunlit kitchen. The first bite delivers a subtle sweetness that is balanced by the mild tang of ricotta, and the toasted coconut flakes add a satisfying crunch that feels like tiny, edible confetti. The texture is silky, yet the coconut gives it a light, almost airy feel, while the ricotta keeps the cake moist and rich without being heavy. It’s a cake that feels indulgent yet surprisingly healthy, a paradox that has my taste buds dancing every time I bite.
What makes this version a standout is the way each component is elevated to play a role in a symphony of flavors. I’ve taken the humble ricotta and turned it into the cake’s backbone, providing a silky texture that keeps the crumb tender. Coconut is not just a garnish; it’s a flavor driver that adds depth and a subtle tropical twist. The use of whole milk ricotta rather than low-fat or cream cheese brings a natural creaminess that can’t be replicated with substitutes. The ratio of butter to flour is carefully calibrated to give a buttery mouthfeel without greasiness. The batter is light, thanks to the right amount of baking powder that creates airy pockets, while the eggs bind everything together into a cohesive structure. I dare you to taste this and not go back for seconds.
I’m not just sharing a recipe; I’m handing you a secret that will elevate your baking game to new heights. This is hands down the best version you’ll ever make at home, and it’s simple enough that even a novice can pull it off. The technique I’ll reveal involves a subtle but critical step that most recipes gloss over—preheating the pan in a specific way that creates a crisp, caramelized crust. If you’ve ever struggled with a cake that turns out dense or dry, you’re not alone, and I’ve got the fix. Picture yourself pulling this out of the oven, the whole kitchen smelling incredible, and the moment you taste it, you’ll wonder how you ever made it any other way. Let me walk you through every single step — by the end, you’ll wonder how you ever made it any other way.
What Makes This Version Stand Out
- Taste: The ricotta’s mild tang pairs perfectly with the sweet coconut, creating a flavor profile that feels both familiar and exotic.
- Texture: The crumb is moist yet airy, thanks to the precise balance of wet and dry ingredients.
- Simplicity: All you need is a handful of pantry staples—no exotic or hard-to-find items.
- Uniqueness: The combination of ricotta and coconut in a cake is rare, giving this recipe a distinctive edge.
- Crowd Reaction: Guests often ask for the recipe after the first bite, making it a conversation starter.
- Ingredient Quality: Using whole milk ricotta and fresh coconut flakes elevates the overall experience.
- Cooking Method: A simple, oven-baked technique that yields professional results.
- Make‑Ahead Potential: The cake keeps well for several days, making it a convenient option for busy schedules.
Alright, let’s break down exactly what goes into this masterpiece…
Inside the Ingredient List
The Flavor Base
All-purpose flour is the silent hero that holds everything together. It provides structure without overpowering the delicate flavors. If you’re aiming for a slightly lighter crumb, substitute half the flour with cake flour, but be aware it reduces the cake’s density.
Sugar is the sweetener that balances the ricotta’s mild tang. I use granulated sugar because it dissolves quickly, ensuring a smooth batter. If you prefer a darker, caramelized sweetness, try using brown sugar, but adjust the baking time slightly to prevent over-browning.
Baking powder is the leavening agent that creates the airy pockets in the cake. A pinch of baking soda can help if you’re using low-fat ricotta, but the recipe already contains the right amount for optimal lift.
Salt is the flavor enhancer that brings out the richness of the butter and the coconut. A half teaspoon is enough to balance the sweetness without making the cake taste salty.
The Texture Crew
Unsalted butter is the source of buttery richness. It melts into the batter, creating a silky mouthfeel. If you’re in a hurry, cold butter can be used, but you’ll need to beat it into the batter until it’s fully incorporated.
Eggs are the binding agent that holds everything together. They also provide structure and help the cake rise. For a vegan version, substitute with flaxseed meal and water or a commercial egg replacer.
Ricotta is the star that gives the cake its signature moistness. Whole milk ricotta is preferred for its creaminess; low-fat ricotta will result in a drier crumb. If ricotta is unavailable, you can use Greek yogurt mixed with a splash of milk to mimic the same texture.
The Unexpected Star
Vanilla extract adds depth and complexity, acting as a flavor bridge between the sweet coconut and the mild ricotta. A dash of almond extract can create a nutty undertone for a different twist. Remember to use pure vanilla for the best aroma.
Sweetened shredded coconut is the crunchy, tropical element that adds texture and flavor. The coconut’s natural oils keep the cake moist and give it a subtle, exotic aroma. For a less sweet version, use unsweetened coconut and add a touch of maple syrup instead of sugar.
The Final Flourish
The combination of these ingredients creates a cake that is moist, flavorful, and visually appealing. Each component plays a specific role, from the structure of the flour to the aroma of the coconut. The result is a cake that feels indulgent yet balanced, a dessert that will make your guests ask for the recipe.
Everything’s prepped? Good. Let’s get into the real action…

The Method — Step by Step
- Preheat your oven to 350°F (175°C) and line a 9‑inch round pan with parchment paper. This step ensures a smooth release and prevents sticking. As the oven heats, you’ll notice the pan’s metal start to glow, a subtle sign that it’s ready. Keep the pan on the middle rack for even heat distribution.
- In a large mixing bowl, whisk together the flour, sugar, baking powder, and salt. The dry mix should be smooth and free of lumps; this ensures an even batter. While you’re whisking, you can add a pinch of sea salt for a subtle flavor boost. Let the mixture sit for a minute to allow the leavening to activate.
- In a separate bowl, beat the eggs until the whites are slightly frothy. This aeration helps the cake rise and creates a lighter crumb. Then add the melted butter and vanilla extract, whisking until fully incorporated. The mixture should be glossy and smooth, a sign that the butter has emulsified.
- Add the ricotta to the wet mixture and blend until smooth. The ricotta should be fully incorporated, leaving no lumps. This step is crucial for the cake’s moist texture. If the batter seems too thick, add a splash of milk to reach the right consistency.
- Fold in the shredded coconut gently, ensuring an even distribution. The coconut should be fully coated by the batter, but avoid overmixing to keep the texture light. The aroma of toasted coconut will start to permeate the batter, giving a subtle tropical scent.
- Pour the batter into the prepared pan and tap the pan lightly on the counter to release any air bubbles. The batter should settle evenly, creating a uniform surface. A smooth top will bake into a golden crust.
- Bake for 30–35 minutes, or until a toothpick inserted in the center comes out clean. The cake should have a slight crack on top, indicating a crisp crust. If you notice the edges browning too quickly, cover them loosely with foil.
- Let the cake cool in the pan for 10 minutes, then turn it onto a wire rack to cool completely. During this time, the cake will set and the flavors will meld. The residual heat will finish the baking process, so don’t rush this step.
- Once cooled, dust the cake with powdered sugar or drizzle a simple glaze made from powdered sugar and coconut milk. This finishing touch adds a sweet, glossy finish. The cake is now ready to serve and impress.
That’s it — you did it. But hold on, I’ve got a few more tricks that will take this to another level…
Insider Tricks for Flawless Results
The Temperature Rule Nobody Follows
Many bakers set their oven to 350°F, but the actual temperature can vary. Use an oven thermometer to confirm the real temperature. If your oven runs hot, reduce the temperature by 25°F. This small adjustment keeps the cake from overbrowning and maintains moisture.
Why Your Nose Knows Best
Your sense of smell can tell you if the batter is ready. When the batter hits the pan, you’ll notice a faint caramel scent. That’s the moment when the cake begins to rise. Trust your nose; if it smells slightly nutty, it’s ready to bake.
The 5-Minute Rest That Changes Everything
After you remove the cake from the oven, let it rest for exactly five minutes before turning it out. This pause allows the internal structure to set, preventing cracks. The rest also lets the flavors meld, creating a richer taste.
The Secret to a Crispy Edge
If you love a crisp edge, place a sheet of parchment over the top of the batter before baking. The parchment will keep the top from browning too quickly while still allowing the edges to crisp. Remove it halfway through baking to let the top caramelize.
The Perfect Chill
If you plan to serve the cake later, chill it in the fridge for at least an hour. The cold will firm up the coconut flakes, making each bite more satisfying. When you take it out, let it sit at room temperature for 10 minutes to soften slightly.
The Final Touch of Sweetness
A light dusting of powdered sugar or a drizzle of honey after baking adds a sweet finish. The sugar should melt into a thin glaze that coats the cake without soaking it. If you prefer a savory twist, sprinkle a pinch of sea salt on top before serving.
The Best Way to Store Leftovers
Wrap the cake tightly in plastic wrap and store it in an airtight container. This prevents the cake from drying out and keeps the coconut flakes fresh. If you’re storing it for more than two days, keep it in the refrigerator.
Creative Twists and Variations
Tropical Pineapple Surprise
Swap the coconut for a mix of pineapple chunks and shredded coconut. The pineapple adds a sweet, tangy flavor that pairs wonderfully with ricotta. Toast the pineapple slightly before adding to the batter for extra depth. This version is perfect for a beach-themed party.
Chocolate Coconut Dream
Add 1/4 cup of cocoa powder to the dry mix for a chocolatey twist. The chocolate complements the coconut, creating a rich, indulgent flavor. Finish with a drizzle of dark chocolate ganache for a decadent presentation. This cake is a hit with chocolate lovers.
Lemon‑Infused Lightness
Replace vanilla with lemon zest and a tablespoon of lemon juice. The citrus brightens the cake, giving it a refreshing finish. Add a handful of fresh blueberries for a burst of color. This version is ideal for spring gatherings.
Almond Crunch Variation
Incorporate 1/2 cup of slivered almonds into the batter. The almonds add a crunchy texture and nutty flavor. Toast the almonds beforehand to bring out their aroma. This twist is great for an autumnal dessert.
Maple‑Sweetened Delight
Swap the granulated sugar for an equal amount of pure maple syrup. The maple adds a subtle caramel flavor that complements the coconut. Reduce the liquid slightly to balance the extra moisture from the syrup. This version is perfect for holiday celebrations.
Savory Herb Edition
Add a teaspoon of dried thyme or rosemary to the batter. The herbs provide a savory counterpoint to the sweetness. Finish with a sprinkle of flaky sea salt on top. This unexpected version works well as an appetizer for a brunch.
Vegan Coconut Ricotta Cake
Replace eggs with a flaxseed mixture (1 tablespoon flaxseed meal + 3 tablespoons water). Use plant-based milk ricotta or a blend of tofu and coconut milk. Keep the rest of the ingredients unchanged. This version is dairy-free yet still moist and flavorful.
Gluten‑Free Adaptation
Use a gluten-free all-purpose blend in place of the regular flour. Maintain the same ratios to preserve structure. Add a tablespoon of xanthan gum to help bind the batter. This adaptation keeps the cake safe for gluten‑sensitive diners.
Storing and Bringing It Back to Life
Fridge Storage
Wrap the cake tightly in plastic wrap and place it in an airtight container. Store it in the refrigerator for up to five days. The cold will keep the coconut flakes from drying out. When ready to serve, let it sit at room temperature for 10 minutes.
Freezer Friendly
Wrap the cake in foil, then place it in a freezer bag. Freeze for up to three months. To thaw, let it sit at room temperature for an hour. The texture remains moist, and the coconut retains its crunch.
Best Reheating Method
Preheat your oven to 300°F (150°C). Place the cake on a baking sheet and heat for 10 minutes, or until warmed through. Add a splash of water to the bottom of the pan to create steam, which keeps the cake moist. Let it cool slightly before serving.