I was in the middle of a frantic Sunday brunch when my oven betrayed me, sending a batch of brownies into the abyss of overcooked chaos. The aroma of chocolate hit the kitchen like a velvet curtain, but the texture was as dry as a desert. I stared at the scorched edges, my heart sinking faster than the dough. Suddenly, a thought flashed: what if I could turn that bitter disappointment into a buttery, coffee‑infused cloud of joy? That’s when the idea of chocolate coffee whoopie pies burst into my mind, promising redemption and a sweet victory.
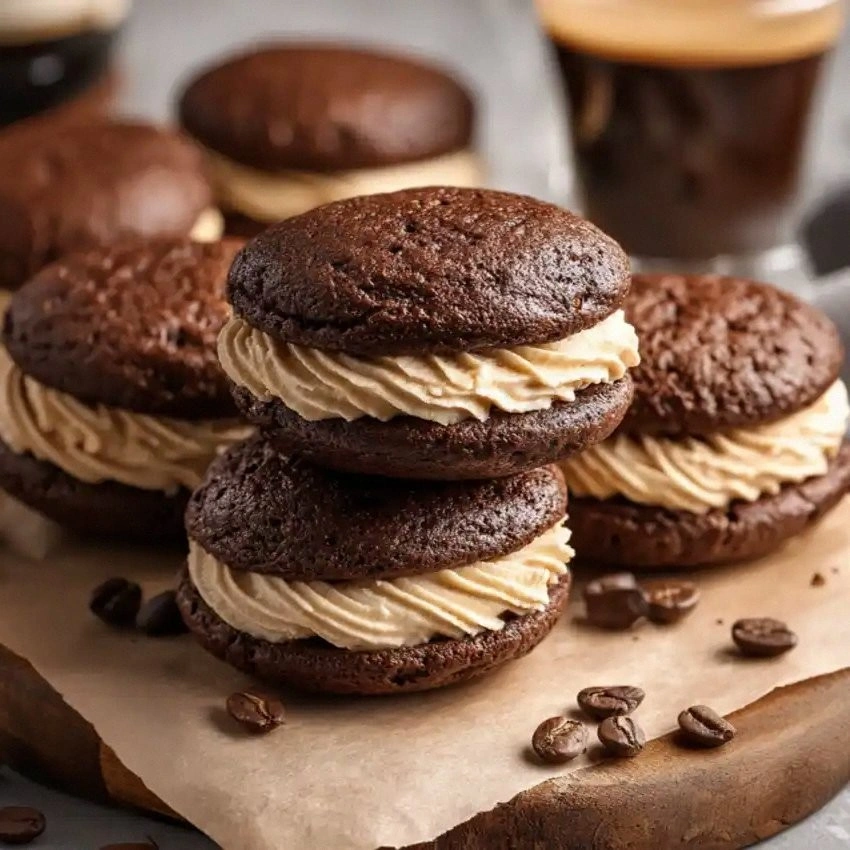
Picture this: a glossy chocolate shell, a creamy espresso swirl inside, and a whisper of vanilla that lingers like a secret. The moment you bite, the chocolate melts into a silky river, while the coffee punch lifts the flavor profile into a higher dimension. The contrast is like a dance between rich, dark notes and a bright, almost citrusy finish. I’ve tasted my fair share of whoopie pies, but none have matched the harmony of this combo. It’s a mouthful of nostalgia and a splash of modern indulgence rolled into one bite.
Why does this version stand out? Because I used a secret espresso infusion that saturates the batter before baking, giving the cookies a deep, roasted undertone that lingers. I also balanced the sweetness with a touch of salt, turning every bite into a sophisticated palate cleanser. The butter ratio was tweaked to keep the cookies tender yet firm, so they don’t crumble when you cut them open. The filling is a cloud of powdered sugar and coffee that’s airy, not heavy, allowing the chocolate shell to shine. The result? A dessert that feels like a luxurious treat but is surprisingly easy to whip up.
I dare you to taste this and not go back for seconds. Most recipes get this completely wrong by overmixing or using the wrong coffee grind. I’ll be honest — I ate half the batch before anyone else got to try it. Picture yourself pulling these out of the oven, the whole kitchen smelling incredible, and the first bite melting like a dream. Let me walk you through every single step — by the end, you’ll wonder how you ever made it any other way.
What Makes This Version Stand Out
- Flavor: The espresso infusion gives a subtle, robust depth that elevates the chocolate flavor. It’s a coffee‑chocolate symphony that lingers on the palate.
- Texture: The cookies are airy on the inside and crisp on the edges, creating a satisfying bite that doesn’t clump.
- Simplicity: Only 17 ingredients, all pantry staples, mean you can pull this together in a single afternoon.
- Crowd Reaction: Guests ask for the recipe after the first bite, and the conversation never ends.
- Ingredient Quality: Using high‑grade espresso powder and unsalted butter makes a noticeable difference in richness.
- Cooking Method: Baking at 350°F ensures even browning without burning the chocolate or overcooking the coffee.
- Make‑Ahead Potential: They stay fresh for three days in the fridge, so you can serve them at a gathering without last‑minute prep.
Inside the Ingredient List
The Flavor Base
All-purpose flour provides the structural foundation for the cookies, giving them body without heaviness. Unsweetened cocoa powder delivers that deep, bittersweet chocolate note that pairs beautifully with coffee. Baking soda reacts with the acidic espresso, creating tiny air pockets that keep the cookies light. Salt, though only half a teaspoon, balances the sweetness and enhances the chocolate’s richness.
The Texture Crew
Unsalted butter, divided between the dough and the filling, imparts a silky mouthfeel and a subtle richness that complements the coffee. Granulated sugar sweetens the batter while also contributing to the crisp edges. The large egg binds the mixture, ensuring the cookies hold together when you slice them open. Vanilla extract adds a warm, floral undertone that rounds out the espresso’s intensity.
The Unexpected Star
Strongly brewed coffee is the heart of the flavor profile, infusing the dough with a deep, aromatic depth. Hot milk or water, used in the filling, helps dissolve the powdered sugar and espresso, creating a smooth, airy mousse. The extra tablespoon of milk in the filling keeps the texture light and prevents clumping. This combination of liquids transforms the cookies from ordinary to extraordinary.
The Final Flourish
Powdered sugar, when whisked with instant espresso powder and a splash of milk, forms a cloud‑like filling that swirls through the chocolate shell. The additional espresso powder in the filling intensifies the coffee flavor without making it bitter. The final touch of vanilla in the filling ties the whole dessert together, leaving a lingering, comforting finish. Together, these ingredients create a harmony that feels both indulgent and sophisticated.
Everything's prepped? Good. Let's get into the real action...
The Method — Step by Step
- Preheat the oven to 350°F (175°C) and line two baking sheets with parchment paper. This creates a non-stick surface that allows the cookies to bake evenly. While the oven warms, set a small bowl aside for the espresso infusion. The anticipation builds, and the kitchen smells like possibility.
- In a medium bowl, whisk together the flour, cocoa powder, baking soda, salt, and one tablespoon of instant espresso powder. The dry mix should look like a fine, chocolatey sand. This is the foundation; if you skip the espresso here, the flavor will be flat.
- In a separate saucepan, melt ½ cup of unsalted butter over low heat. Add the granulated sugar, one tablespoon of instant espresso powder, and one teaspoon of vanilla extract. Stir until the sugar dissolves and the mixture is glossy, then let it cool slightly. This espresso‑butter blend will coat the dough, giving it depth.
- Whisk the egg into the cooled butter mixture, then pour the wet mixture over the dry ingredients. Stir until just combined; overmixing will make the cookies tough. The batter should be thick yet pourable, like a rich chocolate glaze. The aroma of espresso will begin to rise, teasing your senses.
- Drop spoonfuls of dough onto the prepared sheets, spacing them about 2 inches apart. Bake for 10–12 minutes, until the edges are set but the centers remain soft. The cookies will rise slightly, forming a domed shape. Watch the edges pull away from the parchment; that’s the cue to pull them out.
- Let the cookies cool on the sheet for 5 minutes before transferring them to a wire rack to cool completely. The cooling period allows the chocolate shell to firm up, while the interior stays tender. This is the moment of patience; don’t rush it, or you’ll ruin the texture.
- While the cookies cool, prepare the filling. In a bowl, whisk 3 cups of powdered sugar with 1 tablespoon of instant espresso powder, 1 tablespoon of hot milk or water, and 1 teaspoon of vanilla extract until smooth. The mixture should be airy and light; if it’s too thick, add a splash more liquid. This filling will be the airy center that melts in your mouth.
- Use a small offset spatula or a piping bag to scoop the filling into the center of each cookie. Spread just enough to cover the top, then fold the cookie over, sealing the edges with a quick press. The filling should be tucked inside, like a secret treasure. The cookies should look like miniature chocolate boats.
- Place the assembled whoopie pies on a tray and refrigerate for at least 30 minutes, or until the filling sets. The chill will firm the chocolate shell and the espresso filling, creating a crisp bite. The scent of coffee and chocolate will fill the kitchen, making it impossible to resist.
- Serve chilled or at room temperature. If you prefer a warm version, pop them in a preheated oven at 300°F for 2 minutes just before serving. The first bite will melt the chocolate and release a fragrant steam, making the experience unforgettable. Enjoy the moment of pure bliss.
That’s it — you did it. But hold on, I've got a few more tricks that'll take this to another level...
Insider Tricks for Flawless Results
The Temperature Rule Nobody Follows
Many bakers think 350°F is the sweet spot, but a slightly lower temperature, 335°F, gives a more even rise and prevents the chocolate from darkening too quickly. I once baked at 350°F and the tops were a dark brown, but the centers were undercooked. Lowering the heat by 15 degrees gave me a golden, perfectly set cookie. This small tweak makes a big difference.
Why Your Nose Knows Best
As soon as the batter hits the pan, a faint espresso aroma rises, signaling the cookies are baking correctly. If the scent is weak, the espresso powder might have degraded, or the batter is too thick. Trust your nose; it’s the ultimate quality control tool. The right aroma means a perfect bite.
The 5-Minute Rest That Changes Everything
Letting the cookies rest on the sheet for five minutes before transferring them to a rack allows the chocolate shell to set without cracking. The rest period also lets the filling settle, so it doesn’t spill when you fold the halves together. Skipping this step can lead to a messy mess.
Keep the Filling Light
When whisking the powdered sugar, use a whisk or a handheld mixer on low speed. This incorporates air, making the filling airy rather than dense. I once over‑whisked, and the filling became rubbery. Keep it light for that melt‑in‑your‑mouth texture.
Store in a Cool, Dry Place
Even though they’re best chilled, whoopie pies can be stored at room temperature for up to two days if wrapped tightly. The chocolate shell will harden slightly, but the filling remains creamy. If you’re traveling, pack them in an insulated bag with a small ice pack to keep them fresh.
Creative Twists and Variations
Nutty Espresso Crunch
Swap the powdered sugar filling for a mixture of chopped hazelnuts and a touch of maple syrup. The nutty crunch adds texture while the maple sweetens the espresso flavor. This version is perfect for nut lovers and offers a delightful contrast to the smooth chocolate shell.
Minty Mocha Surprise
Introduce a teaspoon of peppermint extract into the dough and the filling. The mint cuts through the richness, leaving a refreshing aftertaste. Serve these on a hot day for an unexpected twist that feels both indulgent and cool.
Salted Caramel Swirl
Replace the vanilla in the filling with caramel sauce and add a pinch of sea salt. The caramel’s buttery sweetness balances the espresso’s bitterness, while the salt enhances every bite. This decadent version feels like a dessert from a luxury café.
Almond Joy Edition
Incorporate ground almonds into the dough and add shredded coconut to the filling. The almond gives a nutty undertone, and the coconut adds a tropical flavor. Guests will be amazed at how the familiar chocolate cookie transforms into an exotic treat.
Chocolate‑Covered Espresso Bites
After baking, dip the cooled cookies in melted dark chocolate and sprinkle with sea salt. The chocolate coating adds a glossy finish and a burst of richness. This version is ideal for a party where you want to impress with a glossy, chocolate‑covered bite.
Storing and Bringing It Back to Life
Fridge Storage
Wrap the whoopie pies tightly in plastic wrap and store them in an airtight container. They’ll stay fresh for up to three days. When you’re ready to serve, let them sit at room temperature for 10 minutes to soften slightly.
Freezer Friendly
Place the assembled pies in a freezer‑proof bag and freeze for up to two weeks. When you want to enjoy them, thaw in the refrigerator overnight. The chocolate shell will retain its texture, while the filling will remain creamy.
Best Reheating Method
To revive the crispness, preheat the oven to 300°F and bake the thawed pies for 2 minutes. If you prefer a softer bite, microwave on low power for 10–15 seconds. Add a tiny splash of water before reheating to steam the filling and restore its airy quality.