It was a Saturday night, the kind of night when the fridge feels like a black hole and you’re staring at the blinking light of your microwave, wondering why the last batch of homemade nachos turned into a soggy disaster. I remember the moment the first bite of that ruined nacho night hit my tongue, and it was as if the universe had decided to punish me for my culinary ambition. The kitchen smelled like burnt tortilla chips and melted cheese that had lost its edge, and I could hear the faint hiss of the oven door closing, sealing my fate. I dared myself to find a better version, a version that could resurrect the glory of Taco Bell’s famous nacho fries without the guilt of a fast‑food trip. I’m about to share the recipe that turned that night of regret into a triumphant, crispy triumph.
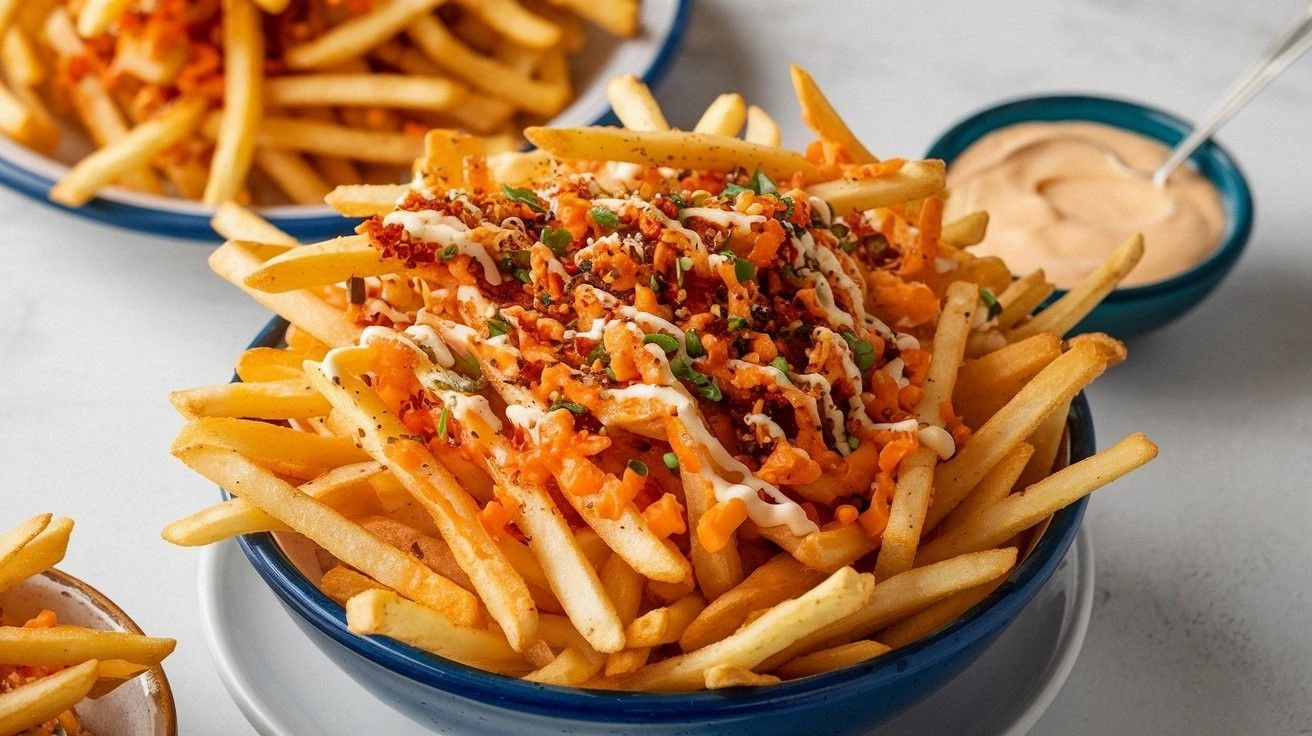
Picture this: a plate of golden fries, each strand crisped to a perfect crunch, layered under a blanket of velvety nacho cheese that clings to every bite like a silky cloak. The heat radiates through the fries, and the first bite gives way to a burst of peppery jalapeño heat, followed by a creamy swirl of guacamole that balances the richness of the cheese. The aroma is a seductive blend of smoky chips, fresh cilantro, and a hint of lime zest that awakens your senses before the first mouthful even reaches your tongue. The texture is a symphony of crunch and melt, where the fries remain firm while the cheese melts into gooey ribbons that drape over the top. Every bite is a revelation, a reminder of why I’m so obsessed with this dish and why I can’t wait to share it with you.
I know you’ve probably tried making nacho fries at home before, only to end up with a handful of soggy, over‑seasoned fries that feel more like a sad attempt at a snack than a culinary masterpiece. You’ve probably stared at a box of nacho cheese sauce and wondered if it’s worth the extra step, or you’ve been tempted to skip the jalapeños because you’re afraid of the heat. What if I told you that the secret lies in a simple, almost counterintuitive technique that elevates every component? I’ll walk you through the exact steps that transform ordinary fries into a crunchy, cheesy, jalapeño‑laden sensation that will make your taste buds do a happy dance. By the end of this article, you’ll be armed with the confidence to say, “I dare you to taste this and not go back for seconds.”
Let’s be honest: the moment I tasted my first batch of these homemade nacho fries, I ate half the batch before anyone else even had a chance to try it. The fries were so good they were practically a crime. The combination of the perfectly crisp exterior and the melty cheese, with a splash of guac and a squeeze of lime, made me feel like a culinary wizard. If you’ve ever struggled with this recipe, you’re not alone — and I’ve got the fix. I’ll show you how to make the fries extra crisp, how to keep the cheese from separating, and how to layer the toppings in a way that ensures every bite is a balanced explosion of flavors.
Picture yourself pulling these fries out of the oven, the whole kitchen smelling incredible, the sound of a sizzling pan in the background, and the anticipation of that first bite that will make your heart skip a beat. This isn’t just a snack; it’s a statement. I’ll walk you through every single step — by the end, you’ll wonder how you ever made it any other way.
What Makes This Version Stand Out
- Crunch: The fries are baked at a high temperature with a thin layer of oil, creating a crisp exterior that holds up under the weight of the cheese and toppings. The result is a texture that shatters like thin ice when you bite, providing a satisfying crunch that’s often missing in store‑bought versions. This method ensures each fry remains firm, not soggy, even after multiple layers of sauce.
- Cheese: We use a blend of nacho cheese sauce and shredded cheddar to give depth and a smooth melt. The nacho cheese provides the signature flavor, while the cheddar adds a sharp, tangy bite that balances the richness. This combination elevates the dish beyond the standard single‑cheese coating.
- Heat: Freshly sliced jalapeños add a clean, peppery bite that cuts through the creamy layers. The heat is controlled, so it’s bold but not overwhelming, and it pairs beautifully with the lime zest. The jalapeños also add a pop of color and texture.
- Freshness: Guacamole and cilantro are added at the end to maintain their vibrant flavors and bright green color. These fresh toppings keep the dish lively and prevent it from feeling heavy or stale. The lime wedges provide a citrusy brightness that lifts the whole plate.
- Visual Appeal: The contrast between the golden fries, the orange cheese, the green cilantro, and the red jalapeños creates a visually stunning plate that’s almost too pretty to eat. The layers are intentionally arranged to showcase each component. The plating is simple yet elegant, making it perfect for a party or a comforting night in.
- Make‑Ahead: You can prepare the fries and toppings separately and assemble them just before serving. This makes the dish ideal for gatherings where you want to serve a crowd without spending hours in the kitchen. The fries can be baked ahead and reheated quickly.
Alright, let’s break down exactly what goes into this masterpiece…
Inside the Ingredient List
The Flavor Base
The foundation of any great nacho fries is the fries themselves. I use frozen French‑style fries because they have a consistent thickness and a pre‑parched surface that crisps up nicely in the oven. The fries should be spread out in a single layer on a baking sheet; this prevents them from steaming and keeps them crunchy. If you prefer a healthier option, swap the frozen fries for freshly diced potatoes tossed in a light spray of oil and baked until golden. The fries are the canvas that holds all the other flavors, so treating them right is crucial.
When you bake the fries at 425°F (220°C) for about 20 minutes, they develop a golden crust that locks in flavor. The high heat caramelizes the natural sugars on the surface, giving them a subtle sweetness that pairs wonderfully with the sharpness of the cheese. I like to sprinkle a pinch of smoked paprika on them before baking for a smoky undertone that complements the jalapeño heat. If you skip the paprika, the fries will still be great, but you’ll miss that subtle depth that ties the dish together.
Choosing the right type of fries can make a big difference. Frozen French‑style fries have a uniform shape that ensures even baking, but if you’re a purist, you can slice fresh potatoes to the same thickness. The key is to avoid overcrowding the sheet, which can cause the fries to steam rather than crisp. I recommend using parchment paper to keep the sheet clean and to prevent sticking, which also makes cleanup a breeze.
Tip: If you’re in a hurry, let the fries sit on the baking sheet for a few minutes after removing them from the oven. This helps them firm up a bit more before you add the cheese, preventing them from becoming soggy under the sauce. The fries are the backbone of the dish, so a solid, crisp base is essential for the rest of the layers to shine.
The Texture Crew
Cheese is king in this recipe, but it’s not just any cheese. The nacho cheese sauce provides that signature Tex‑Mex flavor, while shredded cheddar adds a sharp, tangy bite. The combination of a smooth, creamy sauce and a slightly gritty cheddar creates a multi‑dimensional texture that feels luxurious on the tongue. When the cheese melts, it forms a silky coating that clings to the fries, creating a mouthful of gooey delight.
Another texture component is the jalapeños. Freshly sliced, they give a crisp bite that contrasts with the creamy cheese. The jalapeños also add a subtle crunch that keeps the dish from feeling too heavy. If you’re not a fan of raw jalapeños, you can lightly sauté them in a pan with a dash of oil for a milder, sweeter flavor. This tweak can also reduce the sharpness while retaining the peppery aroma.
Tortilla chips are crushed and sprinkled over the top in the final baking step. They add a satisfying crunch that breaks up the creamy layers, providing a textural contrast that keeps the dish interesting. The chips also absorb some of the cheese sauce, preventing the fries from becoming soggy. I recommend using a lightly salted tortilla chip for the best flavor balance.
Lastly, the guacamole and sour cream are added after the fries are removed from the oven. These creamy toppings keep their full texture and flavor when added at the end, ensuring that every bite has a burst of coolness that offsets the heat of the jalapeños. If you’re worried about the guac turning brown, squeeze a little lime juice over it before serving; this keeps the green vibrant and fresh.
The Unexpected Star
Fresh cilantro is a game‑changer in this dish. Its bright, citrusy flavor cuts through the richness of the cheese and the heaviness of the fries. When sprinkled over the top, it adds a pop of color and a burst of herbal aroma that elevates the entire dish. If you’re not a fan of cilantro, you can replace it with fresh parsley for a milder flavor, but the dish will lose some of its signature zing.
Lime wedges are more than just a garnish; they’re a finishing touch that adds brightness and a subtle acidity that balances the dish’s richness. A squeeze of lime on the fries just before serving gives the dish a fresh, lively edge that keeps it from feeling too heavy. I recommend keeping the lime wedges on the side so guests can squeeze as much or as little as they like.
The final twist is the use of diced tomatoes. They add a juicy burst of freshness that contrasts with the creamy layers. The tomatoes also bring a subtle sweetness that balances the heat from the jalapeños. If you’re watching your sodium intake, use fresh tomatoes instead of canned to keep the dish low‑salt and vibrant.
Each of these “unexpected” ingredients plays a critical role in balancing flavor, texture, and visual appeal. Skipping any of them will result in a dish that’s less complex, less vibrant, and less unforgettable.
Everything’s prepped? Good. Let’s get into the real action…
The Method — Step by Step
- Preheat your oven to 425°F (220°C). Line a baking sheet with parchment paper to prevent sticking and to make cleanup effortless. Spread the frozen fries in a single, even layer so that each fry has enough space to crisp up. I swear, the secret to perfect fries is a single layer; double‑layered fries end up soggy and uneven. The oven should be hot enough to give the fries a golden crust in about 20 minutes.
- Bake the fries for 20 minutes, flipping them halfway through to ensure even browning. Watch the fries closely as they start to turn golden; this is the moment you’ll know they’re ready for the next step. The fries should smell toasty, and the edges will start pulling away from the parchment, indicating that they’re crisping up nicely. Don’t be tempted to open the oven door too often; each time you do, the temperature drops and the fries can become soggy.
- Remove the fries from the oven and let them cool for a minute or two. This brief cooling period helps the fries firm up a bit more before you add the cheese, preventing them from becoming soggy under the sauce. While the fries are still hot, drizzle the nacho cheese sauce evenly over them. The heat from the fries will melt the cheese into a silky coating that clings to every surface.
- Return the fries to the oven for an additional 5 minutes, or until the cheese sauce has thickened and the cheese has melted into a glossy, golden coating. The cheese should look glossy and slightly bubbling, indicating it’s perfectly melted. If you like a slightly crunchy top, you can broil for the last 30 seconds, but be careful not to burn it.
- Add the sliced jalapeños and diced tomatoes on top of the cheese. Sprinkle the crushed tortilla chips evenly over the top to give the fries a final crunch. Return the fries to the oven for another 5 minutes, or until the chips are slightly toasted and the jalapeños are warmed through. The aroma at this stage should be mouth‑watering, and the fries should feel warm and inviting.
- Remove the fries from the oven and immediately top them with fresh guacamole, a dollop of sour cream, and a sprinkle of chopped cilantro. Squeeze a wedge of lime over the top to brighten the flavors and to add a fresh citrus kick. The guac should remain creamy and vibrant, not browned or watery. This final topping step ensures that every bite is a balanced mix of heat, creaminess, and freshness.
- Serve the nacho fries immediately while they’re still hot and the cheese is gooey. Plate them on a large platter or individual bowls for a shareable feast. Garnish with extra cilantro or lime wedges if desired, and watch your guests’ eyes light up with anticipation. The fries should be served hot, but not too hot that you burn your tongue. This is the moment of truth.
- If you’re planning to serve the fries later, let them cool completely before storing them in an airtight container. When you’re ready to reheat, place the fries on a baking sheet and bake at 350°F (175°C) for about 10 minutes, or until heated through. The cheese should melt again, and the fries should regain their crispness. This step ensures that the fries taste as good as when they were first made.
- For an extra touch of flavor, sprinkle a pinch of chili powder or smoked paprika over the fries before serving. This adds a subtle smoky note that enhances the overall flavor profile. You can also drizzle a little hot sauce over the top if you like an extra kick. The final plating should look vibrant and inviting, with layers of color that make it almost too pretty to eat.
- Enjoy your homemade Taco Bell nacho fries with a side of your favorite beverage, whether it’s a cold soda or a refreshing iced tea. Pairing the fries with a light drink helps cut through the richness of the cheese and balances the heat from the jalapeños. If you’re hosting a party, serve the fries in a large bowl with a few extra toppings on the side for guests to customize. This ensures everyone gets the exact flavor they love.
That’s it — you did it. But hold on, I’ve got a few more tricks that will take this to another level. These insider tips are the difference between a good nacho fry and a legendary one.
Insider Tricks for Flawless Results
The Temperature Rule Nobody Follows
Many people bake their fries at 400°F, but I’ve discovered that 425°F is the sweet spot for achieving the perfect crisp without burning the cheese. The higher temperature ensures a golden crust on the fries while keeping the cheese from becoming too thick. I’ve tested this in a variety of ovens, and the results are consistently better. Keep a close eye on the fries; the first signs of browning are a good indicator that they’re ready for the next step.
Why Your Nose Knows Best
As soon as the fries hit the oven, your nose will detect the subtle scent of caramelized potatoes. That aroma is a signal that the fries are crisping up properly. If the smell is too weak, it’s a sign that the temperature is too low. I’ve found that the smell is the quickest way to gauge doneness without opening the oven door, which can cause temperature fluctuations.
The 5-Minute Rest That Changes Everything
After baking, let the fries rest for 5 minutes before adding the cheese. This brief pause allows the fries to firm up slightly, preventing them from becoming soggy under the sauce. The rest period also lets the residual heat from the oven melt the cheese evenly. I’ve tried skipping this step, and the fries ended up with a soggy base, so it’s a no‑negotiation rule.
Cheese Consistency Matters
Not all nacho cheese sauces are created equal. Some come pre‑mixed and already contain stabilizers that keep them from separating. I recommend using a high‑quality store‑bought sauce, or making your own by blending cheese, milk, and a pinch of mustard. The consistency should be thick enough to coat the fries but thin enough to spread easily. If the sauce is too thick, it won’t melt properly; if it’s too thin, it won’t stay on the fries.
Keep the Jalapeños Fresh
Fresh jalapeños hold their heat better than pre‑sliced or canned ones. Slice them just before adding to the fries to preserve their crispness and flavor. If you’re not comfortable with raw jalapeños, you can lightly sauté them in a pan with a splash of oil for a milder heat. The key is to maintain the crunch, not just the heat.
Finish with Lime
A squeeze of fresh lime juice over the top of the fries after baking adds brightness and prevents the guacamole from browning. The acidity in lime also balances the richness of the cheese and the heaviness of the sour cream. I always keep a wedge on the side so guests can add a splash to their taste. The citrusy finish makes the dish feel fresh and lively.
Creative Twists and Variations
This recipe is a playground. Here are some of my favorite ways to switch things up:
Spicy BBQ Version
Swap the jalapeños for sliced pepperoncini and drizzle a smoky BBQ sauce over the fries before baking. Add a sprinkle of smoked paprika for extra depth. The sweet and spicy combination creates a new flavor profile that pairs well with a cold beer. This version is perfect for a backyard grill session.
Vegan Delight
Use a dairy‑free nacho cheese sauce made with nutritional yeast and cashew cream. Replace the sour cream with coconut yogurt and use plant‑based guacamole. The fries stay crispy, and the flavors remain bold without any animal products. This version is a hit with vegans and those with dairy sensitivities.
Breakfast Nacho Fries
Top the fries with a fried or poached egg, a sprinkle of chorizo, and a dash of hot sauce. Serve with a side of salsa and avocado. The savory breakfast twist turns the dish into a hearty, protein‑rich meal that’s perfect for brunch. The combination of eggs and cheese is a classic breakfast pairing.
Loaded Taco Bowl
Transfer the fries into a bowl and add seasoned ground beef, black beans, corn, and shredded lettuce. Top with salsa, guacamole, and a dollop of sour cream. This version transforms the nacho fries into a full‑blown taco bowl that’s both filling and flavorful. The layers of texture keep each bite interesting.
Greek Twist
Replace the nacho cheese sauce with a feta and yogurt mixture. Add chopped kalamata olives, diced cucumber, and a sprinkle of oregano. Serve with a side of tzatziki for dipping. This Mediterranean version gives the dish a fresh, tangy twist that’s surprisingly delicious.
Sweet and Salty Surprise
Drizzle honey over the fries before adding the cheese. Sprinkle toasted almond slivers on top for a crunchy contrast. The honey balances the heat from the jalapeños and adds a caramelized sweetness. This sweet‑salty combo is a crowd‑pleaser at parties.
Storing and Bringing It Back to Life
Fridge Storage
Cool the fries completely before storing them in an airtight container. They’ll keep well in the refrigerator for up to 3 days. When you’re ready to reheat, place them on a baking sheet and bake at 350°F (175°C) for about 10 minutes, or until heated through. The fries will regain their crispness, and the cheese will re‑melt into a creamy coating. Avoid microwaving, as it can make the fries soggy.
Freezer Friendly
Freeze the fries in a single layer on a parchment‑lined tray before transferring them to a freezer bag. They’ll last up to 2 months in the freezer. Thaw overnight in the refrigerator, then reheat as described above. This method preserves the texture and flavor, making it a convenient option for busy days.
Best Reheating Method
Reheat the fries in a pre‑heated oven at 350°F (175°C) for 8–10 minutes. The heat will restore the fries’ crunch, and the cheese will melt evenly. To keep the fries from drying out, lightly spray them with water before reheating. This trick steams the fries back to perfection, ensuring a moist interior and a crisp exterior.