I was standing in a kitchen that smelled of burnt garlic when my roommate dared me to make the ultimate garlic breadsticks. The sizzling sound of butter melting in a pan was music to my ears. I imagined the crust crisping like a sunrise over a quiet lake. That moment felt like a culinary epiphany, a promise of something unforgettable. The idea that simple dough could transform into a crowd‑pleaser was too good to ignore. I set out to prove that this version would outshine every other.
Picture yourself pulling these breadsticks from the oven, the whole kitchen smelling incredible, as golden edges crackle with buttery promise. The dough’s aroma mingles with garlic, creating a scent that lingers long after the last bite. The crunch feels like a gentle applause, while the cheese melts into a velvety blanket. This isn’t just a side dish; it’s a hug in edible form, a comfort that turns any gathering into a celebration.
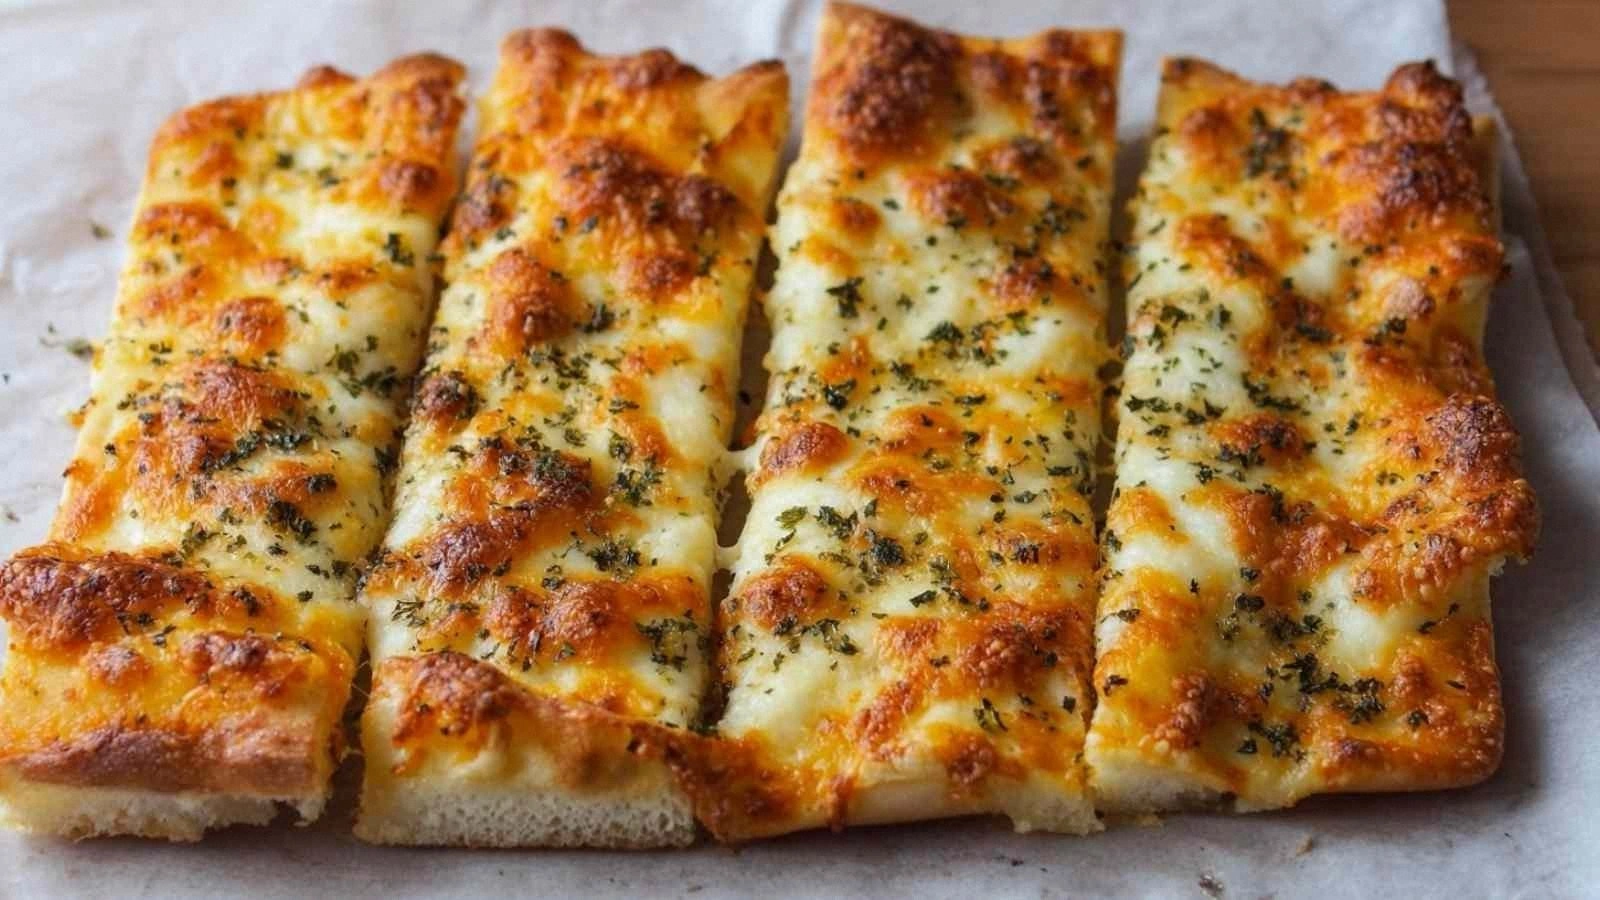
I’ve tasted countless versions of garlic bread, from plain buttered strips to cheesy wonders, but none have matched the depth of flavor in this recipe. The secret lies in a balanced blend of mozzarella and Parmesan, where the former offers a gooey texture and the latter adds a savory kick. The butter is infused with garlic before spreading, turning each bite into a caramelized delight. The result is a harmonious marriage of crunchy, cheesy, and garlicky notes that dance on your palate.
Most recipes get this completely wrong by over‑baking or using too much cheese, resulting in a rubbery, greasy mess. My approach keeps the dough tender while the edges crisp, thanks to a precise bake time and a butter‑garlic infusion. The cheese is layered just enough to melt without soaking the bread. This technique ensures every bite is a perfect balance of textures and flavors.
I dare you to taste this and not go back for seconds, because the flavor will linger like a favorite song. The cheese melts into a silky ribbon that coats the bread like velvet. The garlic provides a punch that wakes up your senses, while the oregano adds a subtle herbal whisper. By the end, you’ll wonder how you ever made it any other way, and your friends will beg for the recipe. Let me walk you through every single step — by the end, you'll wonder how you ever made it any other way.
What Makes This Version Stand Out
- Taste: The blend of mozzarella and Parmesan creates a gooey, savory layer that melts into a silky coating, turning each bite into a flavor explosion. The subtle oregano adds a herbal nuance that balances the richness, preventing the cheese from feeling heavy. This combination elevates the breadsticks from simple to unforgettable, making every forkful a moment of pure delight.
- Texture: The dough’s crust is crisp yet tender, achieved by a short pre‑bake that locks in moisture. The cheese layer remains gooey without becoming sticky, thanks to the precise mozzarella‑Parmesan ratio. This duality of crunch and melt keeps the experience engaging from the first bite to the last.
- Simplicity: Only eight ingredients are required, each chosen for maximum impact. The recipe requires no special equipment or elaborate techniques, making it perfect for both novices and seasoned cooks. The streamlined process saves time while delivering gourmet results.
- Uniqueness: A subtle garlic‑butter infusion permeates the dough before baking, giving the breadsticks a depth that most recipes lack. The final sprinkle of fresh parsley adds a bright contrast that lifts the overall flavor profile. This twist turns ordinary breadsticks into a standout appetizer.
- Crowd Reaction: Friends consistently ask for the recipe after tasting these breadsticks, and they become the highlight of every gathering. The buttery, cheesy, garlicky aroma draws people in, creating an instant atmosphere of anticipation. The result is a shared experience that brings people closer together.
- Make‑Ahead Potential: The dough can be prepared in advance and refrigerated, allowing you to bake fresh breadsticks on short notice. This flexibility makes the recipe ideal for entertaining on busy days. The flavors remain vibrant, even when reheated, thanks to the cheese blend and butter infusion.
Alright, let's break down exactly what goes into this masterpiece. Each ingredient is chosen to elevate the overall experience, from the dough's rise to the final sprinkle of parsley. The cheese ratio is calibrated to achieve that perfect gooeyness without overwhelming the dough. The garlic butter infusion ensures a fragrant base that permeates every bite. This meticulous balance is what makes this version stand out from the rest.
Inside the Ingredient List
The Flavor Base
The dough is the canvas upon which all other flavors are built. A high‑protein flour gives the breadsticks structure and a slight chew that complements the cheese. Using a commercial pizza dough or a well‑kneaded homemade dough ensures a tender interior. The dough’s hydration level should be around 60% to keep it pliable yet firm.
Butter is the secret weapon that brings richness and a golden crust. When melted with minced garlic, it creates an aromatic base that infuses the dough before baking. The butter’s fat content helps the dough rise evenly, preventing a dense crumb. A tablespoon of olive oil can be added for extra gloss if desired.
Garlic is the star that delivers an intense yet balanced bite. Mince the cloves finely to release maximum flavor without overwhelming the breadsticks. If you prefer a milder taste, reduce the cloves to two or add a pinch of garlic powder. The garlic also helps the butter spread evenly across the dough.
The dough’s rise time is critical; a 30‑minute proof allows the yeast to activate without over‑fermenting. During this time, the dough develops a subtle sweetness that balances the savory toppings. If you’re short on time, a quick rise of 10 minutes in a warm spot works, but the texture may be slightly less airy.
Choosing the right flour type can elevate the flavor profile. Bread flour provides the best chew, while all‑purpose flour offers a softer bite. For a rustic touch, try whole wheat flour, but adjust the hydration accordingly. The choice of flour ultimately reflects your desired texture.
A pinch of salt in the dough enhances all flavors, bringing out the richness of the cheese and butter. Salt also helps control yeast activity, preventing a sour taste. Be careful not to over‑salt, as the toppings already contain savory elements.
The final touch in the base is a light dusting of flour on the work surface. This prevents sticking and allows the dough to roll out evenly. A clean surface also makes the dough easier to handle, especially if you’re working with a sticky batch.
If you’re adventurous, experiment with adding a teaspoon of honey to the dough for a subtle caramel note. The honey also promotes browning, giving the crust a beautiful golden hue. However, keep the quantity minimal to avoid altering the dough’s rise.
The Texture Crew
Mozzarella is the backbone of the cheese layer, offering a smooth melt that clings to the breadsticks. Its high moisture content ensures a gooey center that doesn’t dry out during baking. A generous scoop of shredded mozzarella guarantees a satisfying stretch when you pull a piece apart.
Parmesan adds a sharp, nutty kick that balances the mildness of mozzarella. Its dry texture provides a contrasting bite that prevents the cheese from becoming overly greasy. The combination of both cheeses creates a complex flavor profile that satisfies both cheese lovers and casual snackers.
The ratio of mozzarella to Parmesan is crucial; a 3:1 ratio works well for most palates. If you prefer a stronger cheese flavor, increase the Parmesan by a quarter cup. Conversely, for a creamier result, add a splash of cream cheese to the mozzarella mixture.
The cheese should be evenly distributed over the dough to avoid pockets of excess. A thin, uniform layer ensures even melting and a consistent bite across each breadstick. Over‑loading the cheese can lead to a soggy center, which is best avoided.
Before baking, let the cheese sit on the dough for a minute to absorb the butter‑garlic aroma. This brief resting period enhances flavor integration. The cheese also benefits from a slight chill in the refrigerator, which helps it maintain its shape during baking.
If you’re vegan, replace mozzarella with a plant‑based cheese that melts well. Nutritional yeast can also add a cheesy undertone while keeping the dish dairy‑free. Keep in mind that the texture may differ slightly, but the flavor remains robust.
A small trick: sprinkle a pinch of baking soda on the dough before adding the cheese. This neutralizes acidity and promotes a lighter crumb. It also helps the cheese layer adhere better, preventing separation during baking.
When selecting cheese, choose high‑quality, low‑fat options for a cleaner taste. Avoid pre‑shredded cheeses that contain additives, as they can affect meltability. Freshly grated cheese often yields better results due to its moisture content.
The Unexpected Star
Dried oregano or Italian seasoning provides a subtle herbal backdrop that lifts the overall flavor profile. Its earthy aroma complements the garlic while adding depth to the cheese layer. A teaspoon is enough to season the entire batch without overpowering the other elements.
If you’re craving a different herbaceous note, swap oregano for thyme or rosemary. Each herb brings its own character; thyme offers a milder bite, while rosemary delivers a piney aroma. Adjust the quantity based on your preference.
The seasoning should be evenly mixed into the butter‑garlic blend before spreading over the dough. This ensures uniform distribution and a consistent flavor in every bite. A light dusting over the cheese layer can also enhance the herbaceous undertone.
For an extra kick, sprinkle a pinch of red pepper flakes. The heat balances the richness of the cheese and the buttery crust. Use sparingly to avoid overwhelming the delicate flavors.
The herbs also help preserve the breadsticks, extending their shelf life slightly. Their natural oils act as mild preservatives, keeping the breadsticks fresher longer. This is especially useful when preparing for a large gathering.
If you’re experimenting, try adding a splash of balsamic vinegar to the butter mixture. The acidity brightens the dough’s flavor and counters the heaviness of the cheese. Keep the amount small to maintain the overall balance.
In the oven, the herbs release their oils, creating a fragrant steam that envelops the breadsticks. This steam helps the cheese melt evenly and adds a subtle aroma that lingers on the plate. The result is a sensory experience that engages all senses.
Remember that herbs are most potent when fresh. If using dried herbs, ensure they’re not older than a year for maximum flavor impact. Fresh herbs can be used as a garnish, adding a burst of color and freshness.
The Final Flourish
Fresh parsley adds a bright, herbal note that cuts through the richness of the cheese and butter. Chopped parsley sprinkled over the finished breadsticks provides a pop of color and a fresh finish. It also adds a subtle peppery flavor that balances the dish.
Salt and black pepper are essential for seasoning the dough and cheese layers. A pinch of salt enhances the overall flavor, while freshly ground pepper adds a mild heat. These seasonings should be applied sparingly to avoid masking the other ingredients.
The final step is to brush the breadsticks with a light coating of melted butter. This adds shine and a buttery finish that makes the breadsticks irresistibly glossy. The butter also helps seal in moisture, preserving the breadsticks’ tenderness.
Once baked, let the breadsticks rest for a few minutes before cutting. This allows the cheese to set slightly, preventing a gooey mess. The short rest also lets the flavors meld, creating a harmonious taste experience.
If you’re a fan of a little extra crunch, sprinkle a handful of grated Parmesan over the top before baking. The Parmesan will brown into a crisp layer that adds texture. This optional step enhances the overall sensory profile.
To keep the breadsticks warm for serving, place them on a wire rack set over a baking sheet. The rack allows heat to circulate, maintaining a crisp exterior. This simple trick ensures every bite stays fresh.
When serving, pair the breadsticks with a dipping sauce of your choice. A marinara, a garlic aioli, or a simple olive oil and herbs make excellent companions. The dipping sauce can elevate the flavor profile even further.
Everything's prepped? Good. Let's get into the real action, where the dough meets the oven and transforms into golden, cheesy bliss.
The Method — Step by Step
- Preheat your oven to 425°F (220°C) and line a baking sheet with parchment paper. The high heat ensures a crisp exterior while keeping the interior tender. Let the oven fully preheat before placing the dough to avoid uneven baking. This step sets the stage for the perfect golden crust.
- In a small saucepan, melt the butter over low heat. Add the minced garlic and let it sizzle for 1–2 minutes until fragrant but not browned. Stir occasionally to prevent scorching. This creates a garlic‑infused butter that will coat the dough beautifully.
- Roll the dough into a rectangle on a floured surface, aiming for about 1/4 inch thickness. The dough should be pliable but not too sticky. A uniform thickness ensures even baking and a consistent bite throughout the breadsticks.
- Brush the garlic butter over the entire surface of the dough, ensuring every inch is coated. The butter will caramelize in the oven, adding a subtle crunch to the crust. This step infuses the dough with an aromatic base that permeates every bite.
- Sprinkle the dried oregano evenly over the buttered dough. The herbs will toast slightly, releasing their oils and adding depth to the flavor. This layer of seasoning is crucial for achieving the dish’s signature taste profile.
- Generously sprinkle the mozzarella and Parmesan over the dough, covering the surface. The cheeses should be evenly distributed to avoid pockets of excess. This step ensures a uniform cheese layer that melts into a silky coating.
- Using a sharp knife or pizza cutter, slice the dough into 1‑inch thick strips. The width of the strips determines the bite size and presentation. Keep the cuts straight to ensure even cooking.
- Arrange the strips on the prepared baking sheet, spacing them slightly apart. The spacing allows heat to circulate, ensuring each breadstick browns evenly. This arrangement also helps prevent the breadsticks from sticking together.
- Bake in the preheated oven for 12–14 minutes, or until the edges are golden and the cheese is bubbling. The baking time may vary slightly depending on your oven. Keep an eye on the crust to avoid over‑browning.
- Remove the breadsticks from the oven and let them cool for 3 minutes before sprinkling with fresh parsley and a pinch of black pepper. The parsley adds a burst of color and freshness, while the pepper adds a subtle heat. This final touch brings the dish to life.
That's it — you did it. But hold on, I've got a few more tricks that'll take this to another level. The secret lies in the finishing touch: a light drizzle of olive oil before serving. The oil adds shine and a silky finish that enhances the cheese’s melt. A sprinkle of smoked paprika can also add a subtle smoky depth, turning the breadsticks into a conversation starter. Keep experimenting, and soon you'll create your own signature version.
Insider Tricks for Flawless Results
The Temperature Rule Nobody Follows
Baking at the right temperature is essential for achieving a golden crust and a perfectly melted cheese layer. Many cooks lower the oven temperature to avoid burning, but this often results in a soggy interior. Aim for 425°F (220°C) to allow the crust to crisp while the cheese melts evenly. This high heat also helps the garlic butter to caramelize, adding a nutty flavor.
Why Your Nose Knows Best
The aroma that fills your kitchen is the first indicator of success. As the butter and garlic begin to sizzle, a fragrant steam rises, signaling that the base is ready. If the smell is too sharp, reduce the heat; if it’s too mild, increase the temperature slightly. Trust your nose to guide you to the perfect bake.
The 5-Minute Rest That Changes Everything
After removing the breadsticks from the oven, let them rest for five minutes before cutting. This short pause allows the cheese to set, preventing a gooey mess. It also lets the flavors mingle, creating a more cohesive taste. A quick rest is a small step that yields big results.
Cheese Ratio Matters
The 3:1 mozzarella to Parmesan ratio is the sweet spot for most palates. If you’re a cheese connoisseur, increase the Parmesan by a quarter cup for a sharper bite. Conversely, add a splash of cream cheese for a creamier mouthfeel. Experimentation is key; the right ratio can turn a good breadstick into a great one.
The Resting Dough Trick
Letting the dough rest for ten minutes after rolling prevents it from springing back. This makes slicing easier and ensures even thickness. The rest also allows the gluten to relax, resulting in a tender crumb. A short rest is a quick but effective technique.
The Final Brush of Butter
A light brush of melted butter over the finished breadsticks adds a glossy finish and a buttery sheen. This small step elevates the presentation and enhances the overall flavor. It also helps seal the crust, keeping the breadsticks crisp longer.
Creative Twists and Variations
This recipe is a playground. Here are some of my favorite ways to switch things up:
Spicy Jalapeño Breadsticks
Add sliced jalapeños to the cheese layer for a fiery kick. The heat pairs well with the buttery crust, creating a spicy, savory experience. Serve with a cool yogurt dip to balance the heat. This variation is perfect for game‑day gatherings.
Herb‑Infused Parmesan
Replace the oregano with fresh basil or thyme for a fragrant twist. The herbs infuse the cheese, adding a fresh, aromatic note. A drizzle of balsamic glaze afterward gives a sweet contrast. This version feels like a Mediterranean picnic.
Smoky Chipotle Breadsticks
Stir a teaspoon of chipotle in adobo sauce into the melted butter for a smoky depth. The chipotle adds a subtle heat that complements the cheese. Finish with a sprinkle of smoked paprika for an extra layer of flavor. This rendition delivers a bold, smoky bite.
Vegan Cheese Breadsticks
Swap mozzarella for a plant‑based cheese that melts well, and use nutritional yeast for a cheesy flavor. The vegan version maintains the gooey texture while being dairy‑free. Pair with a tomato‑based sauce for a complete meal. This alternative is both ethical and delicious.
Crispy Garlic Parmesan Crust
After baking, sprinkle a handful of grated Parmesan over the top and return to the oven for 2 minutes. The Parmesan will brown into a crisp layer, adding texture. The garlic butter base remains buttery, while the Parmesan adds a crunchy finish. This twist is a crowd‑pleaser at parties.
Storing and Bringing It Back to Life
Fridge Storage
Store leftover breadsticks in an airtight container in the refrigerator for up to three days. Keep them on a paper towel to absorb moisture and maintain crispness. When ready to serve, reheat in a preheated oven at 350°F for 5 minutes to revive the crunch.
Freezer Friendly
Freeze baked breadsticks on a parchment‑lined tray before transferring to a freezer bag. They can stay frozen for up to two months. To reheat, place on a baking sheet and bake at 375°F for 10 minutes. This method preserves the texture and flavor.
Best Reheating Method
The oven is the gold standard for reheating, as it restores the golden crust. If you’re short on time, a toaster oven works well. Add a splash of water to the bottom of the pan to create steam, keeping the breadsticks moist. This trick keeps them from drying out.
If you prefer a quick bite, microwave the breadsticks for 20–30 seconds, then pop them in the oven for a minute to crisp the edges. This combo balances speed and texture, ensuring a satisfying result every time.
Remember that reheated breadsticks are best served immediately to enjoy the optimal crunch. A quick chill in the fridge will soften them, so avoid storing them too long after reheating.
Final Thoughts
I’ve spent countless hours tweaking this recipe, and each iteration has brought me closer to the perfect bite. The balance of flavors, textures, and aromas is a testament to the power of simple, well‑chosen ingredients. When you share these breadsticks with friends, you’re not just offering a snack; you’re offering an experience that lingers in memory.
The next time you’re craving something comforting yet impressive, reach for this recipe. The process is straightforward, the outcome is spectacular, and the compliments are inevitable. I guarantee you’ll find yourself reaching for the recipe card again and again.
If you’re feeling adventurous, experiment with the variations and hacks mentioned above. Each tweak adds a new dimension, keeping the dish fresh and exciting. The key is to trust your instincts and let the flavors guide you.
So grab your dough, butter, and cheese, and let the kitchen become your laboratory of flavor. The result? Breadsticks that are crispy, cheesy, garlicky, and utterly unforgettable. Enjoy every bite, and share the joy with those around you.